View All Posts
read
Want to keep up to date with the latest posts and videos? Subscribe to the newsletter
HELP SUPPORT MY WORK: If you're feeling flush then please stop by Patreon Or you can make a one off donation via ko-fi
#CODING #DIY #ESP32 #JAVASCRIPT #LEDS #PROGRAMMING #TECHNOLOGY

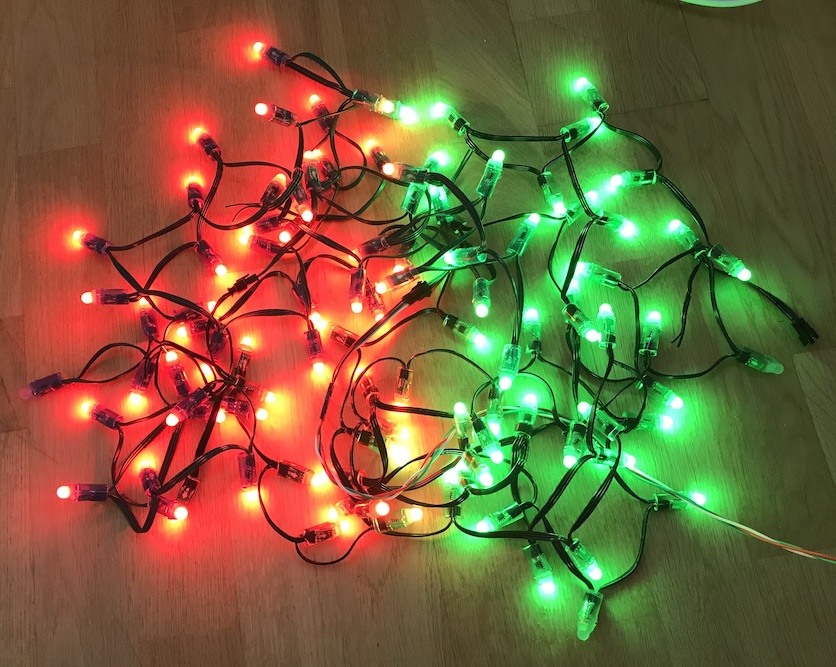
Lots of LEDs? It’s not Christmas yet!

I had a big bundle of addressable WS2811 LED strings and an ESP-CAM board (an ESP32 dev board with a camera). There’s only one possible project that you can do with these components. Turn the disorganised chaos of lights into something a bit more organised.

As an added bonus I’ve ended up duplicating the image processing code in JavaScript so you don’t even need a camera on your ESP32 board - you can just use a plain dev board to drive the LEDs.

You can see the results of my efforts in the video below and I’ll run through a bit more detail of the code in the following text.

The full sample code can be found here: https://github.com/atomic14/self-organising-leds

If you want to do this yourself then you will need an ESP32 dev board of some kind and of course you’ll need some kind of addressable LEDs. I’m using the FastLED library for driving the LEDs so with some small code changes you can probably support pretty much any addressable LEDs.

ESP32 and ESP-CAM Boards

Our challenge comes down to a very basic problem, given access to a stream of images from a camera identity the approximate locations of each LED in 2D space. Once you’ve done that it’s a simple problem to map from each LED’s x and y location onto a frame buffer containing the pattern you want to show.

There’s a bunch of boiler plate code to initialise the ESP-CAM - I took inspiration from the sample code here and copied the bits I needed to get the camera up and running.

An important change I’ve made is only capture greyscale images at the lowest framesize:

config.pixel_format = PIXFORMAT_GRAYSCALE;
config.frame_size = FRAMESIZE_QQVGA;

And then to grab a frame from the camera we simply do:

    camera_fb_t *fb = esp_camera_fb_get();
    Frame *frame = new Frame(fb);
    esp_camera_fb_return(fb);

With our Frame class grabbing a copy of the pixels along with the width and the height of the image.

pixels = (uint8_t *)malloc(fb->height * fb->width);
memcpy(pixels, fb->buf, fb->height * fb->width);
width = fb->width;
height = fb->height;
length = fb->width * fb->height;

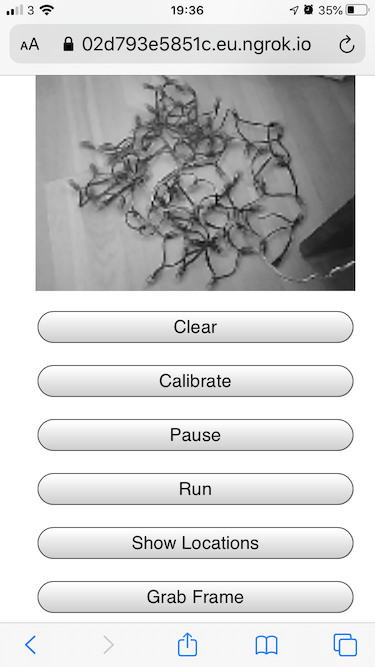
The image below shows a frame grabbed from the ESP-CAM sensor.

Grabbed Frame

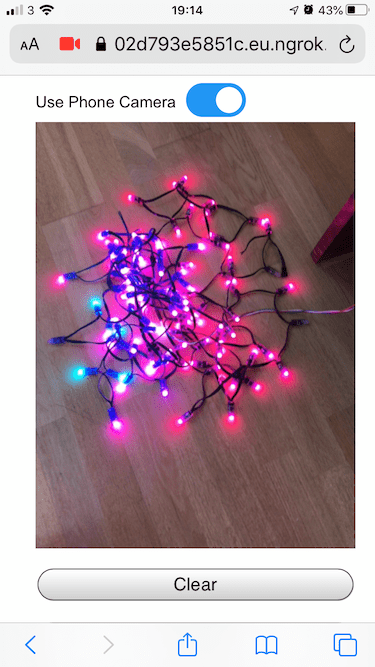
For the JavaScript version of this code it’s a bit more complicated. One of the biggest problems is that we need to be running over HTTPS to have access to the camera - more on this later….

const stream = await navigator.mediaDevices.getUserMedia({
  video: { facingMode: "environment" },
  audio: false,
});
const canPlayListener = () => {
  // the video is loaded and we can grab frames
  onVideoReady(video);
  video.removeEventListener("canplay", canPlayListener);
};
video.addEventListener("canplay", canPlayListener);
video.srcObject = stream;
video.play();

Once we have a video stream coming from the camera we can grab a frame by drawing the video to a canvas context and then getting the imageData from it.

function getVideoFrame(video: HTMLVideoElement, canvas: HTMLCanvasElement) {
  const width = video.videoWidth;
  const height = video.videoHeight;
  const context = canvas.getContext("2d");
  // draw the video to the canvas
  context!.drawImage(video, 0, 0, width, height);
  // get the raw image bytes
  const imageData = context!.getImageData(0, 0, width, height);
  // convert to greyscale
  const bytes = new Uint8Array(width * height);
  for (let y = 0; y < height; y++) {
    for (let x = 0; x < width; x++) {
      const r = imageData.data[(y * width + x) * 4];
      const g = imageData.data[(y * width + x) * 4 + 1];
      const b = imageData.data[(y * width + x) * 4 + 2];
      // https://en.wikipedia.org/wiki/Grayscale#Converting_color_to_grayscale
      const grey = Math.min(255, 0.299 * r + 0.587 * g + 0.114 * b);
      bytes[y * width + x] = grey;
    }
  }
  return bytes;
}

Phone Interface

Now we can grab frames we just need to grab a frame with no LEDs lit, light one LED, grab another frame and then compare the two. The difference should tell us where the LED is. To avoid noise or small movements of the camera having a bit impact we apply a guassian blur to the captured frames before taking the difference.

This is a of course a very naive and simple algorithm and could easily be improved on.

In the C++ code of the ESP32 we do all this directly in code. In the JavaScript version we call API functions on the web interface of the ESP32 to turn LEDs on and off and once we’ve finished the processing send up the calculated positions of the LEDs to the board.

In our ESP32 code we create a framebuffer and draw patterns into it. We then use the locations of each LED to work out what color it should be.

Organised

To solve the issue of needing HTTPS to access the camera and also needing the API calls to be HTTPS as well (we can’t mix content nowadays!) we need a way of serving both the UI and the API from the ESP32 web server over HTTPS. There are web servers that support HTTPS and self signed certificates available for the ESP32 but this leads to other problems and would require a rewrite of the device code. An easy workaround to this problem is to use a service such as ngrok to provide a secure URL from the cloud through our computer to the ESP32 device. Slightly convoluted, but it works!

This in only needed if you are not using an ESP-CAM and have to use your phone’s camera for calibrating the LEDs. Sign up for a free acount with ngrok and then find the IP address of your ESP32 board:

ping espcam.local
PING espcam.local (10.0.1.17): 56 data bytes
64 bytes from 10.0.1.17: icmp_seq=0 ttl=255 time=14.343 ms
64 bytes from 10.0.1.17: icmp_seq=1 ttl=255 time=6.493 ms

Take the IP-Address and ask ngrok to start proxying requests for us:

ngrok http 10.0.1.17 -inspect=false

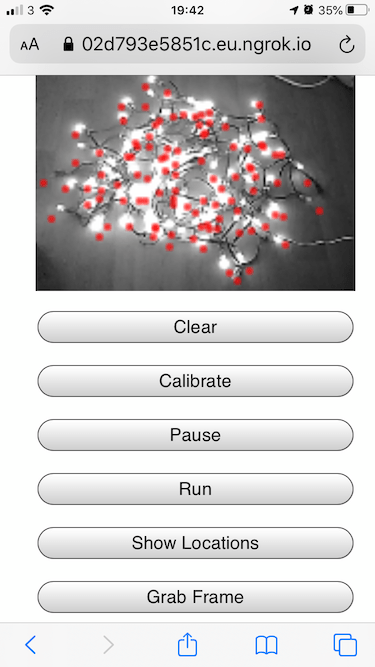
You’ll need steady hands - there’s quite a lot of latency going on so the space between turning an LED on and off and grabbing a frame can be quite large. I slightly moved as I was taking the frame to show the locations so the positions are slightly off.

LED locations

Checkout the video to see how well it works - surprising for such a simple algorithm.

#CODING #DIY #ESP32 #JAVASCRIPT #LEDS #PROGRAMMING #TECHNOLOGY

Related Posts

Interesting LED Curtain - Dove into hacking an LED curtain and discovered that despite lacking visible daisy chaining, it's hackable! With LEDs pre-programmed for their position, it can receive collective data and recognize individual signals. Flashed WLED firmware onto an ESP32 and, voila, it lit up beautifully, even supporting 2D grid patterns for cool visuals. The key components: a BLE SoC, buffer IC for level shifting, and a curious way of LED data handling that's cleverly efficient.
The PCBs are in production - what have I messed up? - After some stress and trepidation, I finally took the plunge and sent my PCB design off for manufacturing. My design centers around building a large seven-segment clock with LED filaments. Jumping hurdles such as voltages, pin usage, and limiting the load on my power supply, I've settled on the ESP32 as the system's heart and come up with a final circuit design. While doing this, I've quickly realized I could improve my layout and fixed a small mistake. Also, I've prepared for either types of LED filaments - the high-voltage ones or the larger, 3v ones. However, I did bungle up a couple of things on the enable line of the shift registers and board layout. But hey, this is a learning curve, right? Can't wait to get the boards and see what other exciting errors surface!
Decoding AVI Files for Fun and... - After some quality time with my ESP32 microcontroller, I've developed a version of the TinyTV and learned a lot about video and audio streaming along the way. Using Python and Wi-Fi technology, I was able to set up the streaming server with audio data, video frames, and metadata. I've can also explored the picture quality challenges of uncompressed image data and learned about MJPEG frames. Together with JPEGDEC for depth decoding, I've managed to effectively use ESP32's dual cores to achieve an inspiring 28 frames per second. Discussing audio sync, storage options and the intricacies of container file formats for video storage led me to the AVI format. The process of reading and processing AVI file headers and the listing subtype 'movi' allowed me to make significant headway in my project. All in all, I'm pretty chuffed with my portable battery powered video player. You can check out my code over on Github!
Minimalist Microcontroller: Building a Bare-Bones Dev Board - In a thrilling DIY endeavour, I attempted to build the most minimalist ESP32 dev board possible. Diving deep into the schematic of the ESP32 S3 WROOM module, I chopped out the non-essentials and whittled our needs down to bare bones. The experiment saw me juggling USB data lines and voltage regulators, waving goodbye to an array of capacitors and connectors and boldly embracing the simplicity of direct connections. Despite a few hitches, the miniature Frankenboard came alive, proving that sometimes less is more...at least in the world of microcontrollers.
A Faster ESP32 JPEG Decoder? - An intriguing issue appeared in the esp32-tv project that deals with speeding up JPEG file decoding using SIMD (Single Instruction Multiple Data) instructions, showing immense performance boost. However, there were some notable differences in speed when it comes to drawing the images versus simply decoding them. The problem was found to be with the DMA drawing mechanism and the way the new fast library decodes the image all at once. But despite this hiccup, by overlapped decoding and displaying process, a high frame rate can still be achieved. Joined me in this dissecting process and my initial tests showing approximately 40 frames per second display rate, on our journey to find the most efficient way to get images on screens.

Related Videos

Magic LEDs: Self-Organizing with ESP32 CAM & Simple Image Processing! - Unleash your creativity and transform chaos into order using an ESP32 camera board, image processing, and a string of WS2811 RGB LEDs. Find out how wiring, level shifting, and a simple web interface bring this mesmerizing project to life.
Make Your Christmas Tree Dance to the Beat! - Transform your Christmas tree into an interactive light show using a string of 200 WS2811 addressable LEDs, self-organizing LEDs project, and an ESP32 to drive them. Learn how to map images onto LED locations and create amazing visual effects.
Most Interesting Addressable LEDs that I've Ever Seen - So, I got this nifty 2x2 meter 400 LED curtain and immediately went to work dismantling it. The LED strands are tapped off the main wire, rather than daisy-chained, which is a departure from the norm. Turns out, these LEDs are pre-programmed, allowing them to intelligently latch onto the right serial data. Unraveling the control unit, we see an IR receiver and other key components responsible for driving the LED strings. Despite my misgivings about deciphering in-built Bluetooth characteristics, I hooked the circuit back up with our dependable WLED software and got some amazing grid patterns. Interestingly, the LEDs operated smoothly at 3.3V. All in all, a fun exploration of hacking this LED curtain.
Live GPIO Viewer - In my latest discovery, I found an incredibly efficient visualization tool from the last outpost workshop that upgrades how I check the status of the GPIO pins on my ESP32. It's super simple to use and allows me to monitor pin activities directly. I set up a couple of LEDs and a button on various GPIO pins to demonstrate its effectiveness and the results were fantastic. Although it currently supports only digital input and output and PWM, I'm optimistic it will expand with time. Thanks to the open-source community, you can find the setup instructions in a GitHub repo. This tool is a revelation and I highly recommend it.
Custom ESP32 PCB Soldering - Watch the process of soldering and testing a custom ESP32 circuit board for a Moon Lamp project, featuring various components like a linear regulator, output drivers, and indicator LEDs.
HELP SUPPORT MY WORK: If you're feeling flush then please stop by Patreon Or you can make a one off donation via ko-fi
Want to keep up to date with the latest posts and videos? Subscribe to the newsletter
Blog Logo

Chris Greening


Published

> Image

atomic14

A collection of slightly mad projects, instructive/educational videos, and generally interesting stuff. Building projects around the Arduino and ESP32 platforms - we'll be exploring AI, Computer Vision, Audio, 3D Printing - it may get a bit eclectic...

View All Posts