View All Posts
read
Want to keep up to date with the latest posts and videos? Subscribe to the newsletter
HELP SUPPORT MY WORK: If you're feeling flush then please stop by Patreon Or you can make a one off donation via ko-fi
#CIRCUIT ERROR #ELECTRONICS #ESP32 #PCB DESIGN #SCHEMATIC ANALYSIS #TROUBLESHOOTING #USB2244

The new PCBs arrived for the ESP32-TV project and, as you can see from the video, they look great. Only one bodge resistor was needed to get them working!

Bodges

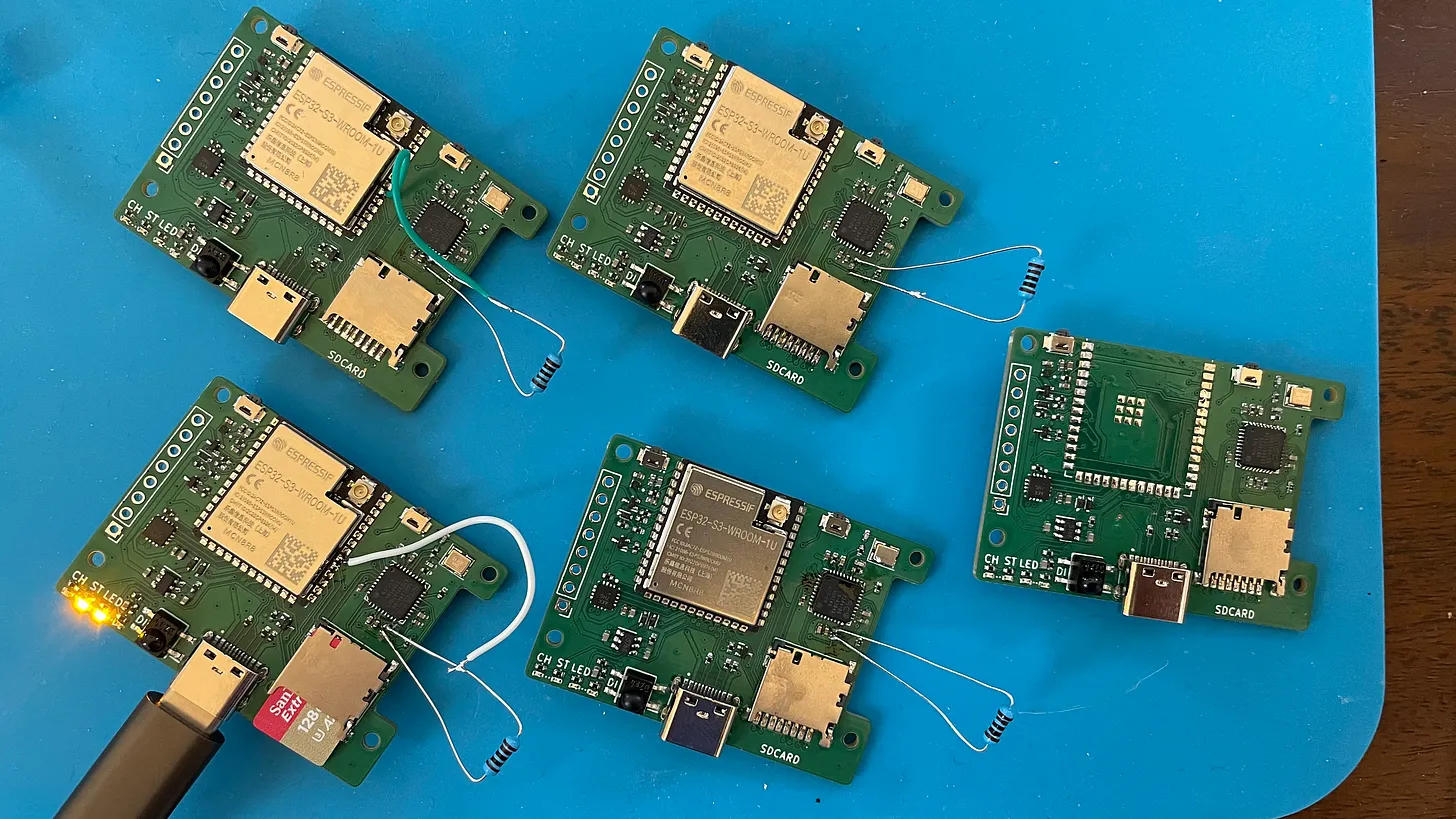
The ESP32 and USB2244 are both setup to share the same USB connection and SD Card. To make this work I’m holding the USB2244 in reset mode whcih should make all it’s pins go into a high impedence state.

In my original schematic I was doing this using a 100K pull down resistor, but there’s a sneaky hidden pull up resistor on the pull up pin that’s not documented anywhere.

This means that both the ESP32 and the USB2244 are both active and both trying to use the USB connection - not what we wanted at all!

Alls well that ends well though, it’s a pretty easy fix.

But there’s a more catastrophic error on the PCB. Have a look at this part of the schematic and see if you can spot the problem:

Schematic

Watch the video so see if you were correct :)

#CIRCUIT ERROR #ELECTRONICS #ESP32 #PCB DESIGN #SCHEMATIC ANALYSIS #TROUBLESHOOTING #USB2244

Related Posts

Minimalist Microcontroller: Building a Bare-Bones Dev Board - In a thrilling DIY endeavour, I attempted to build the most minimalist ESP32 dev board possible. Diving deep into the schematic of the ESP32 S3 WROOM module, I chopped out the non-essentials and whittled our needs down to bare bones. The experiment saw me juggling USB data lines and voltage regulators, waving goodbye to an array of capacitors and connectors and boldly embracing the simplicity of direct connections. Despite a few hitches, the miniature Frankenboard came alive, proving that sometimes less is more...at least in the world of microcontrollers.
The PCBs are in production - what have I messed up? - After some stress and trepidation, I finally took the plunge and sent my PCB design off for manufacturing. My design centers around building a large seven-segment clock with LED filaments. Jumping hurdles such as voltages, pin usage, and limiting the load on my power supply, I've settled on the ESP32 as the system's heart and come up with a final circuit design. While doing this, I've quickly realized I could improve my layout and fixed a small mistake. Also, I've prepared for either types of LED filaments - the high-voltage ones or the larger, 3v ones. However, I did bungle up a couple of things on the enable line of the shift registers and board layout. But hey, this is a learning curve, right? Can't wait to get the boards and see what other exciting errors surface!
ESP32-S3: Which Pins Should I Use? - As an enthusiast of the ESP32-S3's versatility, I recognized the importance of understanding which pins are best to avoid. Inspired by the Random Nerds page for the classic ESP32, I've created a comprehensive pinout for the ESP32-S3 available on GitHub. The community's input is highly valued – suggestions and corrections are welcome to refine this resource into a dynamic guide for developers.
ESP32-S3 Hardware SPI on the Adafruit ST7789 - I've had some commenters point out the issue with the slow display updates in my recent Arduino Nano ESP32 video. It turns out, the software SPI of the Adafruit_ST7789 library was the culprit. Lo and behold, the solution is simple - using the hardware SPI constructor of the library. Apparently, this isn't well documented, so I wrote some code to serve as reference for myself and others who might run into the same snags. Trust me, the difference in speed is absolutely bonkers. Check out the video to see the magic in action.
ESP32-S3 USBMSC - Can we make it faster? - After lots of tinkering, I've managed to improve the speed of writing to the SD Card of my ESP32-TV considerably, but it's still not as fast as I'd like. The Arduino 'readRaw' and 'writeRaw' functions were the culprits, they can only write one sector at a time! After bypassing this and using IDF functions, writing speed improved by 70%. I also experimented with writing to the SD Card in the background, which ironically yielded even better results. However, it's still slower than I'd like, so I've got a crazy new plan: using a cheap IC (GL823) for SD card interfacing and a USB multiplexer switch to swap connections between ESP32 and GL823. It's a wild ride, but that's how we make progress!

Related Videos

A Potentially Explosive Error - Buckle up folks, this video is a thrilling one! There's everything from unboxing my new ESP32 TV boards that arrived from PCB Way to discovering some hidden issues. We're talking about some pesky problems, surprises, and even a potential catastrophic error that could've led to a disaster. The main dish is the high-speed SD card access over USB - ultimately achieving a whooping transfer rate! But, the journey is a roller-coaster ride, from the project completely failing initially, to some smart hacks and triumphant moments. All the peripherals worked well, from the display to the sound amplifier and even the infrared receiver. Despite the ups and downs, there's a lot to learn and that's what makes this video exciting! Can't wait to share the improvements I have in mind for turning the prototype into the ultimate all-in-one device. But first, let's address the elephant in the room - an ill-placed diode that's a ticking bomb, because you know, safety first!
Revamped Audio PCB Walkthrough: Fixing Mistakes & Enhancing Functionality - Learn how to modify a custom PCB for an ESP32 walkie-talkie project, including exposing spare GPIO pins, freeing up the DAC pin, saving GPIO pins for the microphone and amplifier, and wiring up the shutdown pin on the amplifier for low power mode.
Happiness is a Working Blink Sketch - ESP32-S3 PCBs Are Here! - In this video, I explore the functions of my newly arrived little boards - essentially a PCB that an esp32 S3 room module can be connected to. I put the board's voltage regulator, battery charger, and a 3 watt class D amplifier to the test, and damn, they work perfectly! I even use breadboards, connecting them together to facilitate a wider workspace. I gave the pcbs a spin, conducting sanity checks to ensure full functionality. With a successful battery charge and impressive voltage measurements, my PCB's are up to the challenge. I also dabble in some circuit jargon, explaining schematics, amplifiers, battery chargers and a clever mosfet approach. To top it off, I solder on an ESP32 module and prove that yes, it actually works. Stay tuned for a following video where we'll work with a speaker and display!
Lots of Stuff - And a NEW PCB! It's a rare mailbag video. - In today's episode, I'm unboxing some goodies from PCB way - my super tiny esp32 breakout boards, which I'm planning to use to recreate a mini TV complete with speakers and a display. Also received some convenient adapter boards for easier testing. Excited to explore a new Arduino Nano esp32 based on a different, tinier module, and contrasting it with other products like the Tiny Pico. Also up for testing is a new mini wear electronic load compared to my old one, and an ATX power adapter for more USB ports. I'll be testing power banks, playing with inexpensive yellow displays and nunchucks for fun gaming projects, and testing out an RGB bead curtain with hackable possibilities. Also, under my ongoing experiments is a Raspberry Pi zero, turning into a 'Doom' playing device with added sound and game controllers. Finally, an air quality measuring device for detecting air particles, CO2 levels, humidity, temperature and other parameters is up for exploration as well. A whole array of fun projects queued up, so stay tuned!
Streaming Video From an SD Card on the ESP32. - In this video, we successfully navigated the convoluted process of setting up movie file playback from an ESP32 with an SD card. There were a few bumps along the way, such as confusing USB data pins and the intricacies of various video container formats, but our quirky PCBWay board came through. Discussed an ingenious method of creating a simple custom video container format with ffmpeg that can be effortlessly parsed by the ESP32. And yes, even though the tiny TV guys use AVI files, we pushed boundaries and learned a thing or two about list chunks, sub formats, and hex dumps. The result? We achieved smooth audio playback and video frame skipping for an optimal balance. Check out the streaming version on WiFi for more fun!
HELP SUPPORT MY WORK: If you're feeling flush then please stop by Patreon Or you can make a one off donation via ko-fi
Want to keep up to date with the latest posts and videos? Subscribe to the newsletter
Blog Logo

Chris Greening


Published

> Image

atomic14

A collection of slightly mad projects, instructive/educational videos, and generally interesting stuff. Building projects around the Arduino and ESP32 platforms - we'll be exploring AI, Computer Vision, Audio, 3D Printing - it may get a bit eclectic...

View All Posts