🌈 ESP32-S3 Rainbow: ZX Spectrum Emulator Board! Get it on Crowd Supply →
View All Posts
read
Want to keep up to date with the latest posts and videos? Subscribe to the newsletter
HELP SUPPORT MY WORK: If you're feeling flush then please stop by Patreon Or you can make a one off donation via ko-fi
#BILINEAR-INTERPOLATION #ESP-IDF #ESP32-S3 #HARDWARE-DEBUGGING #I2C #IMAGE-SCALING #JPEG-ENCODING #MJPEG #MLX90640 #THERMAL-IMAGING #USB-UVC #WEBCAM

In a previous project, I made an ESP32 pretend to be a USB webcam.

This time, I wanted to do it properly - turn it into a real USB webcam with a real camera.

I also wanted to push things a bit further - I’ve got an I2C thermal camera module - why not turn that into a USB camera?

The ESP32S3 has native USB support, which means it can present itself directly as a USB device - this opens up a whole world of possibilities.

For USB video, I’m using USB UVC (USB Video Class). I’m also sticking to MJPEG to make things simple.

The nice thing about MJPEG is that it’s not a video codec in the traditional sense — it’s just a stream of individual JPEG images, sent one after another over USB.

Simple case: a normal camera module

Many ESP32-compatible camera modules already output JPEG-compressed images.

That means the “encoder” part of the webcam is basically free:

Our code turns into this:

  1. Capture a JPEG frame from the camera
  2. Hand the JPEG bytes to the USB stack
  3. Repeat

You really can’t get much simpler than that.

You can use any S3 dev board - there are some nice ones that have built in cameras, but you could use a standard dev board and a camera module.

Camera Modules

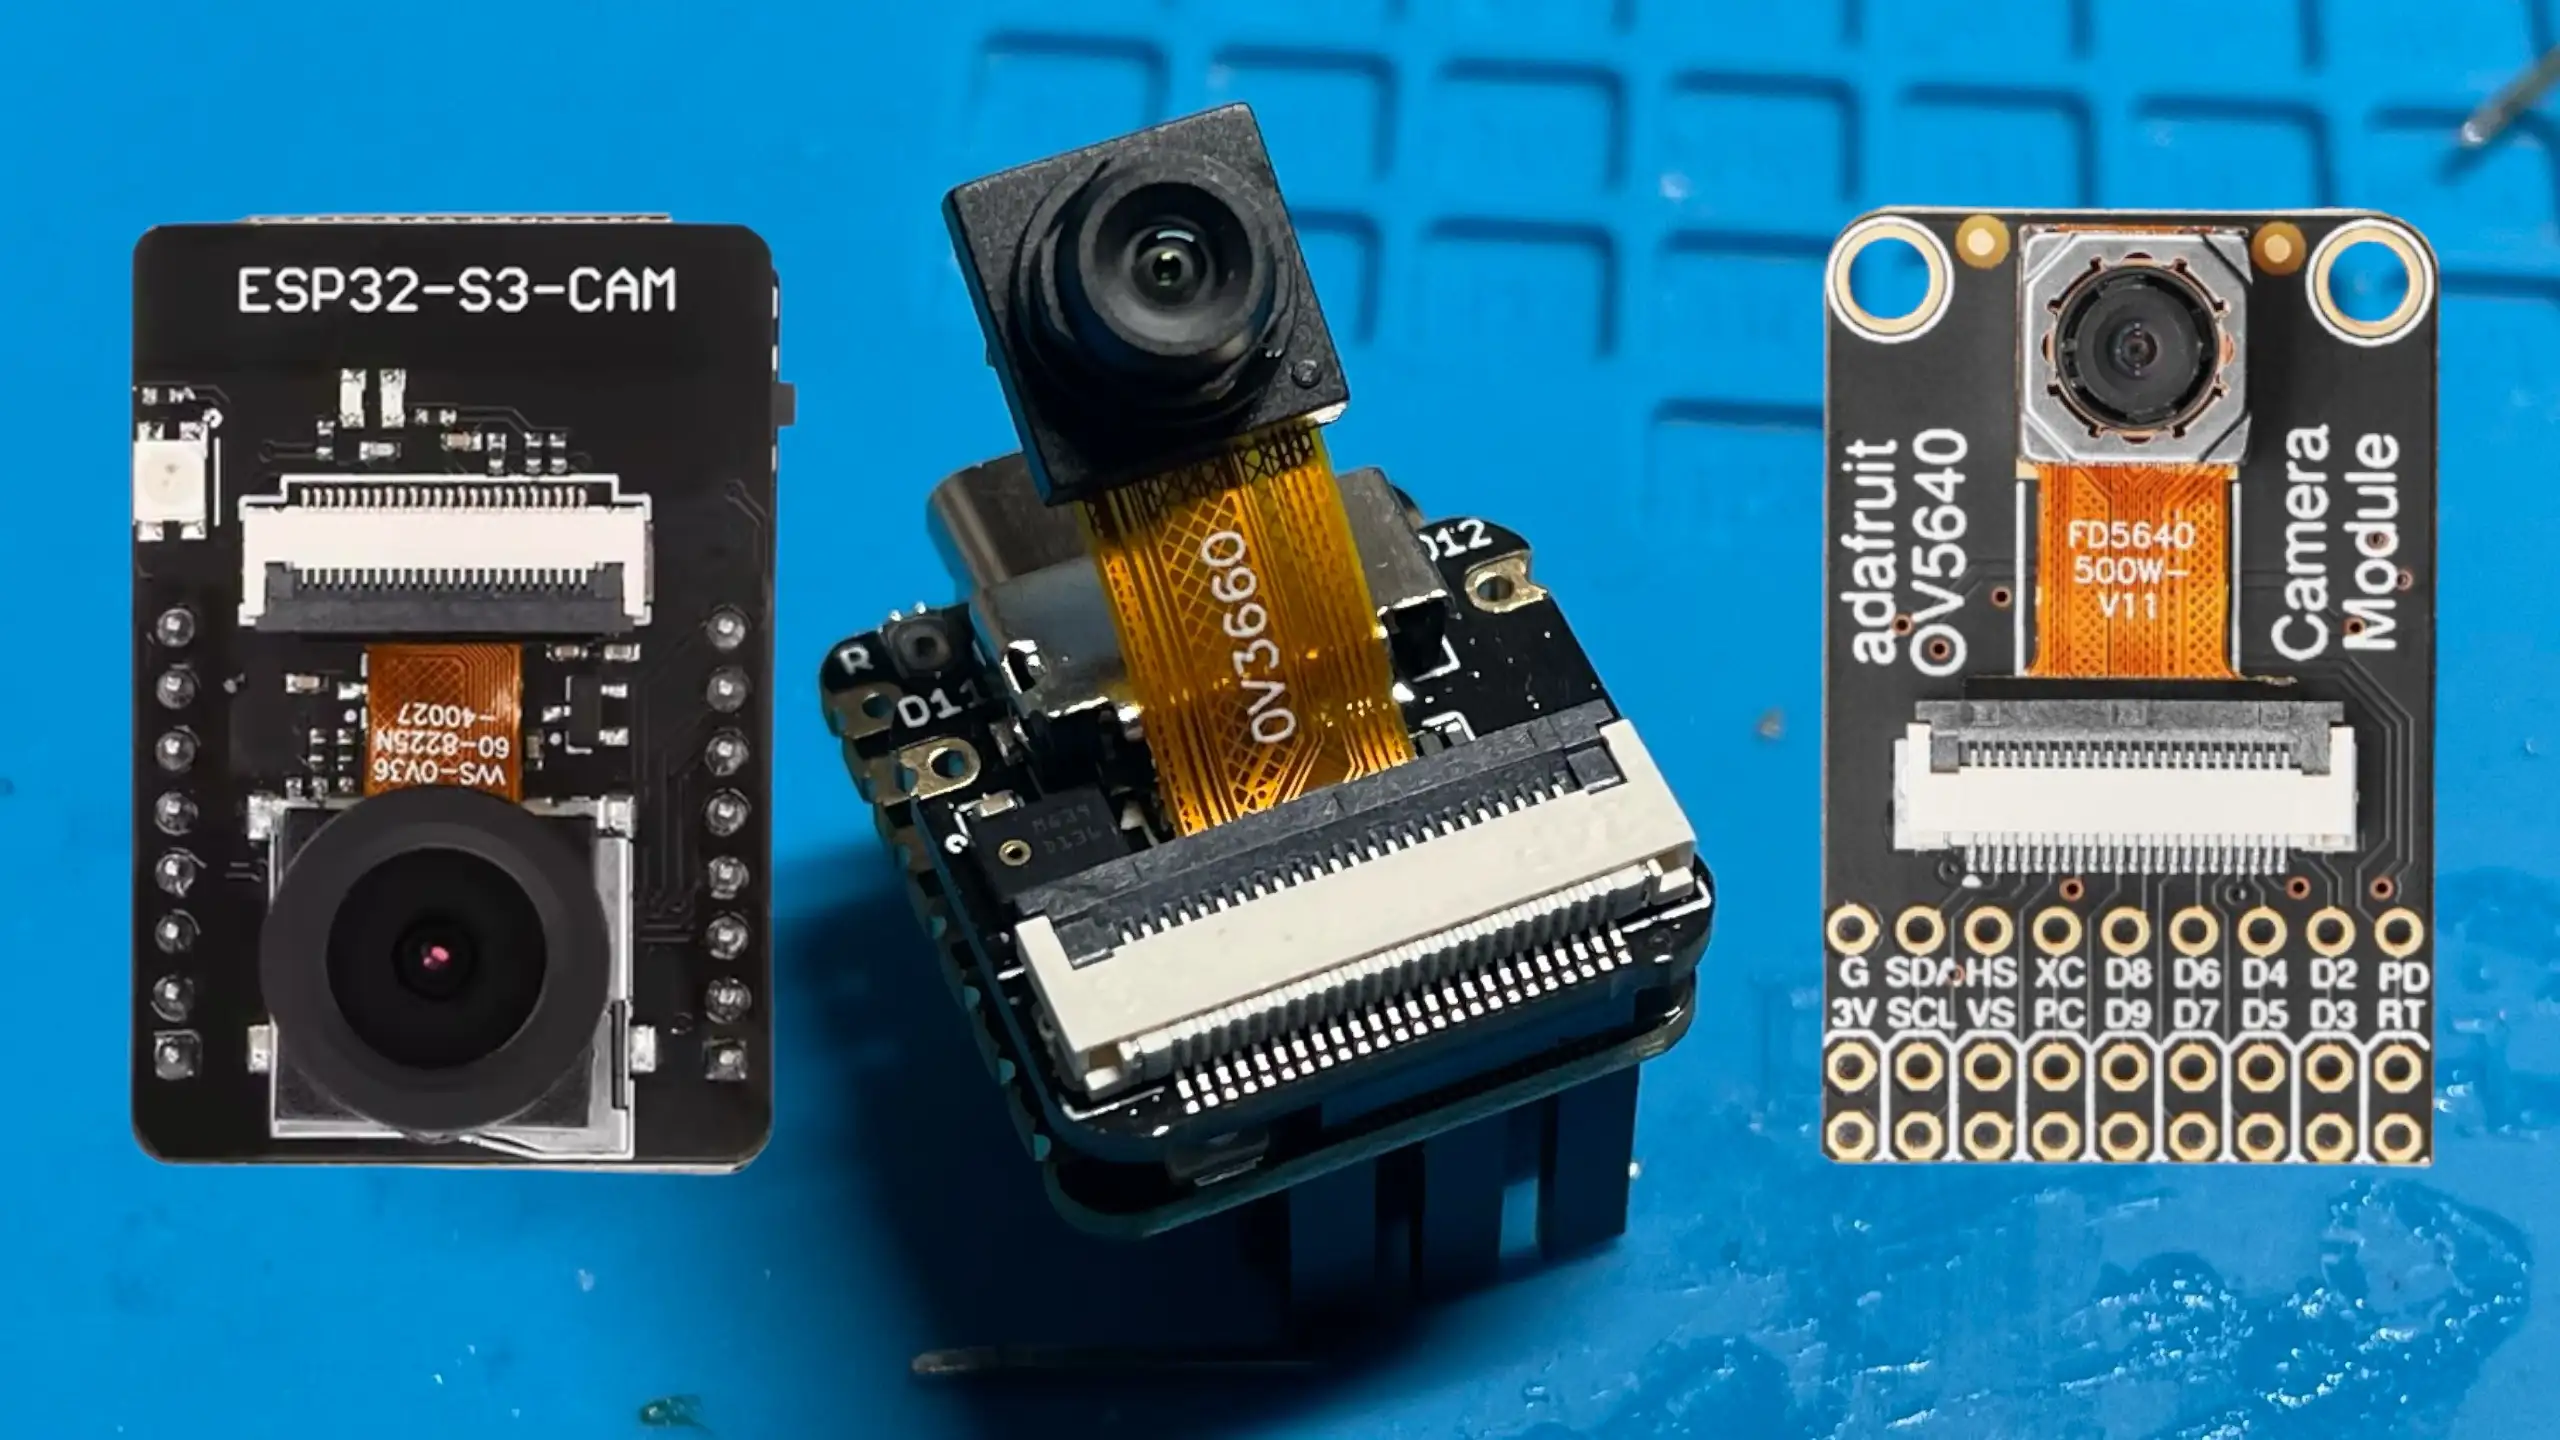
What you can’t use is the old ESP-CAM boards - firstly these don’t have USB and secondly the standard ESP32 doesn’t have native USB support.

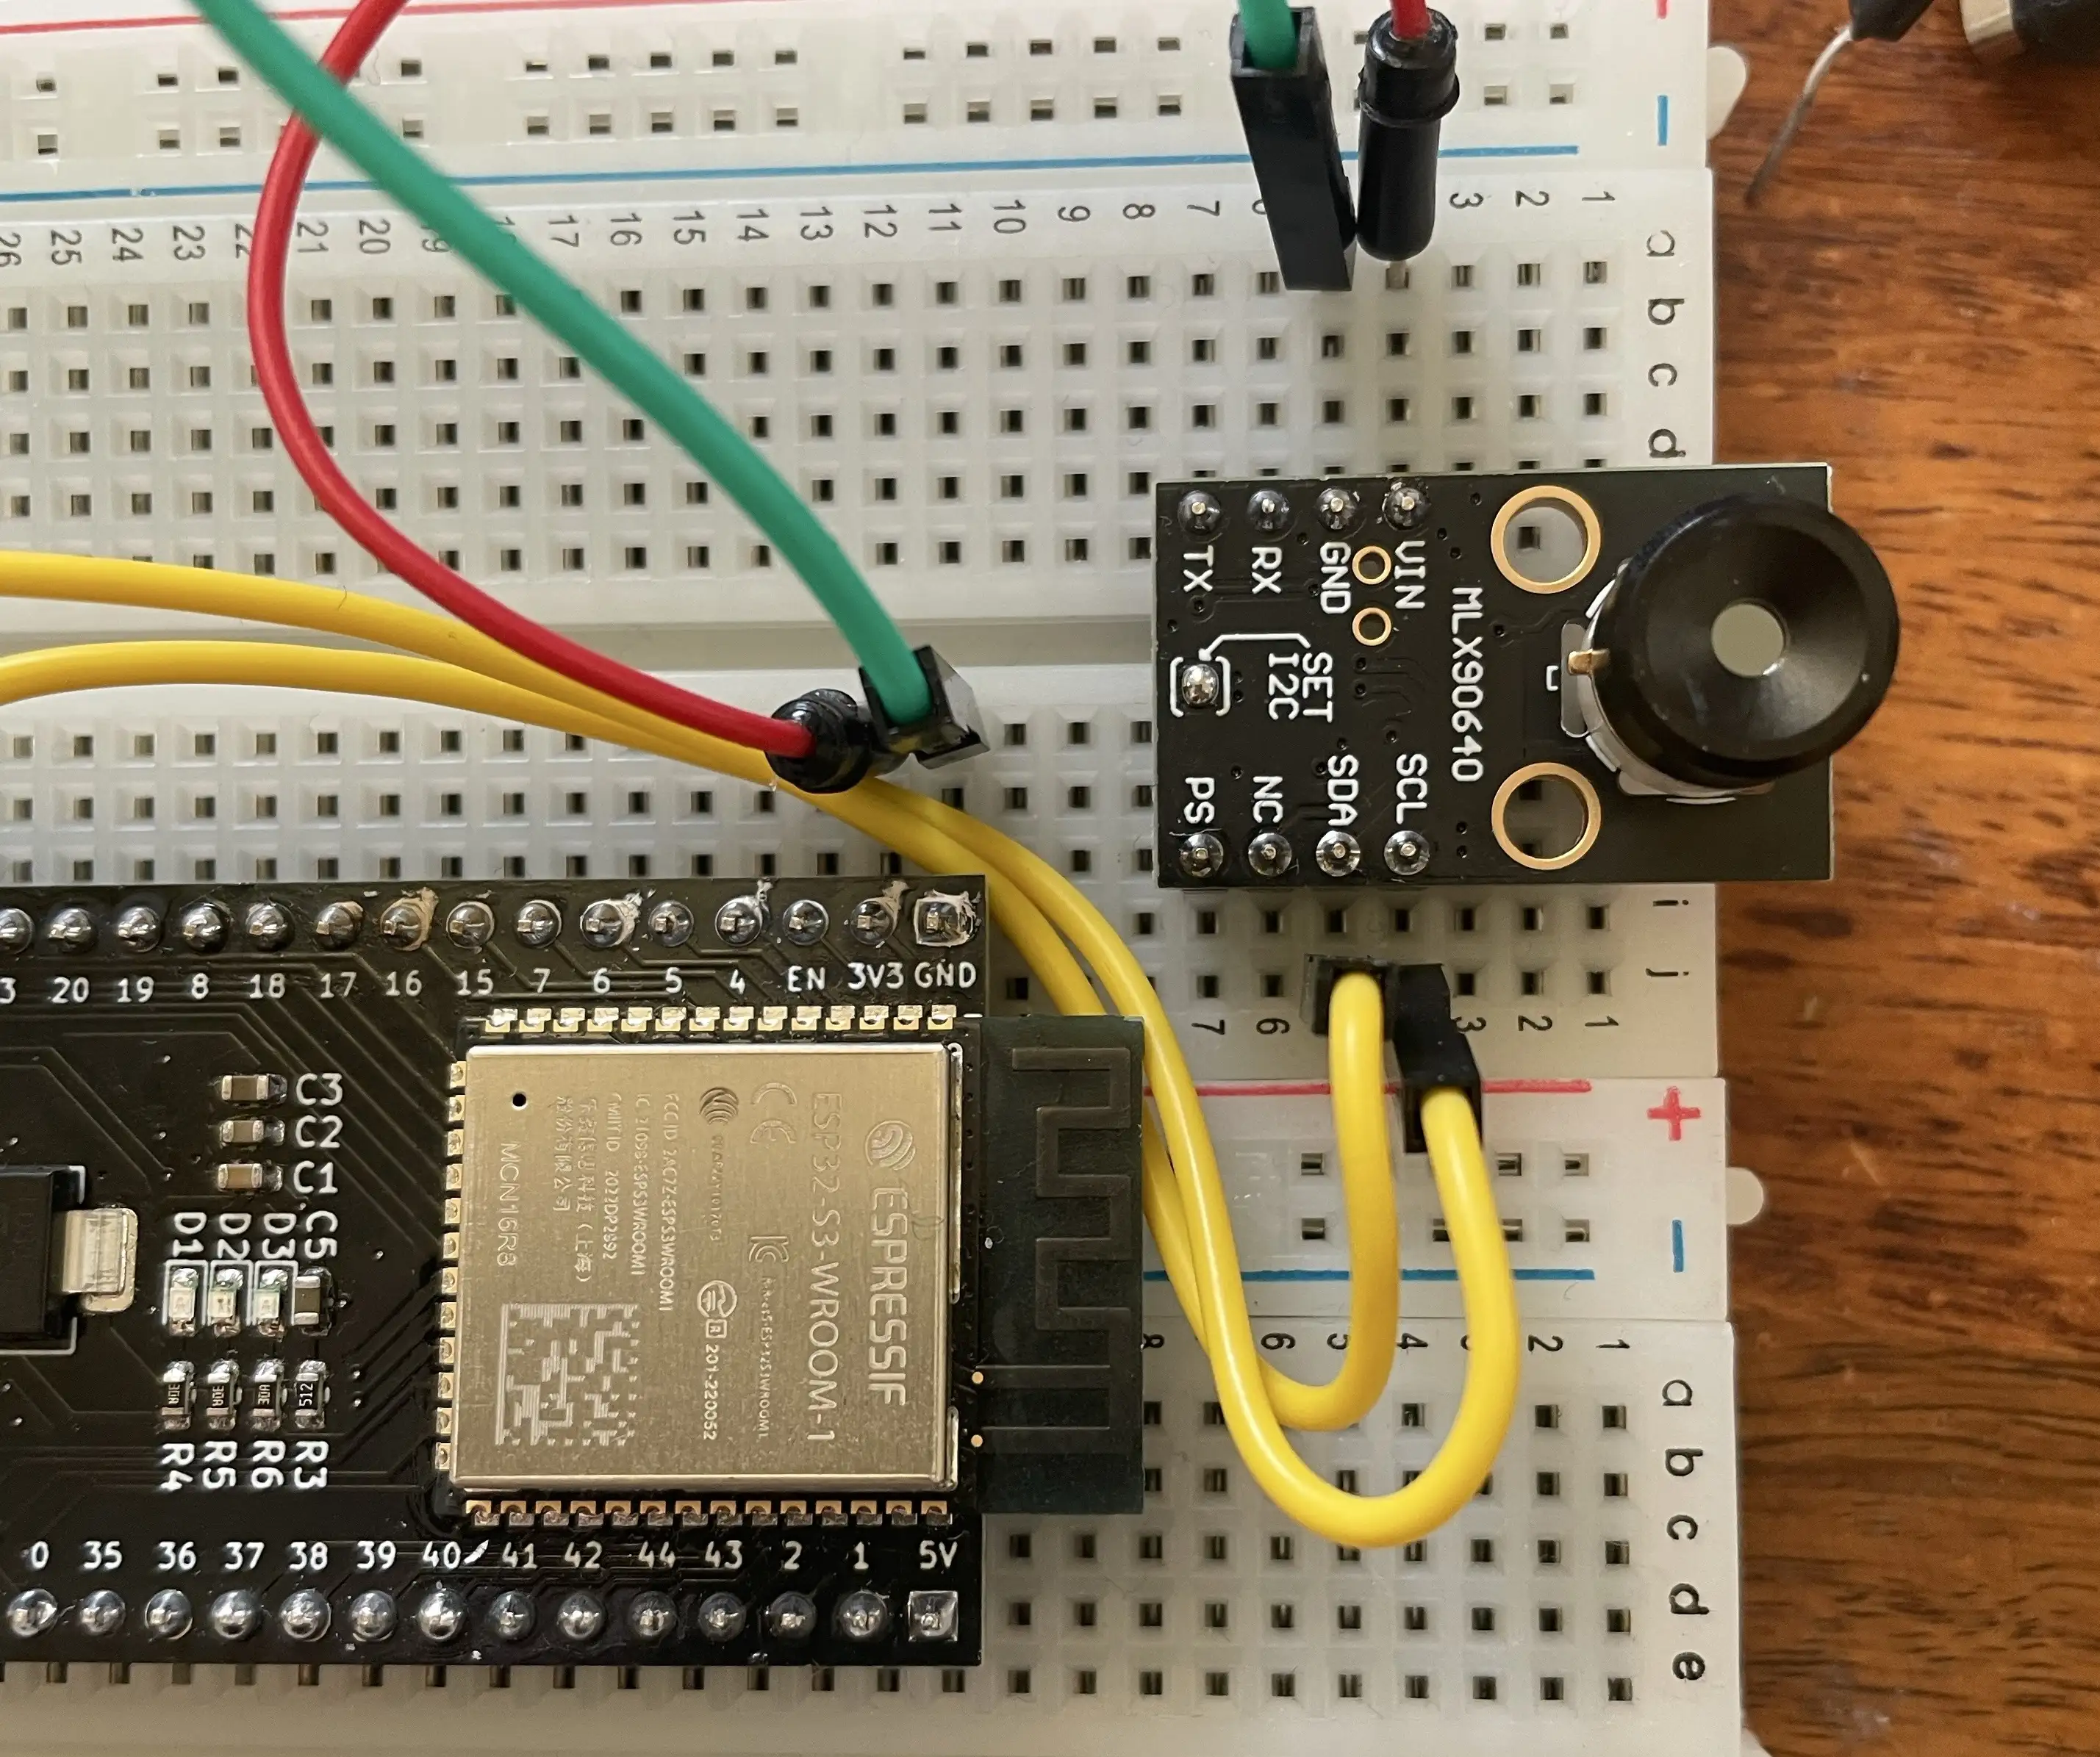
Moving to thermal: a 32×24 infrared camera

The thermal camera is where things get interesting.

I’m using an MLX90640. This module outputs a 32×24 pixel temperature image over I2C. That’s just 768 pixels total - really tiny and not very usable raw.

But it is enough data to work with.

Our new code flow is:

  1. Read the raw thermal image over I2C
  2. Convert temperatures to grayscale or false colour
  3. Scale the image up to 320×240
  4. JPEG encode it
  5. Stream it over USB using UVC

IR Module

I2C debugging (and a reminder to myself)

Before any of it actually worked, I managed to lose a fair bit of time debugging what I thought was an I2C software problem.

  • I scanned addresses.
  • Checked pull-ups.
  • Tried different voltages.
  • Swapped code around.

Eventually, I looked at the board under a microscope abd found that it was just a dodgy solder joint on the on-board 3.3 V regulator.

You can see a detailed post on this here

3V3 Regulator

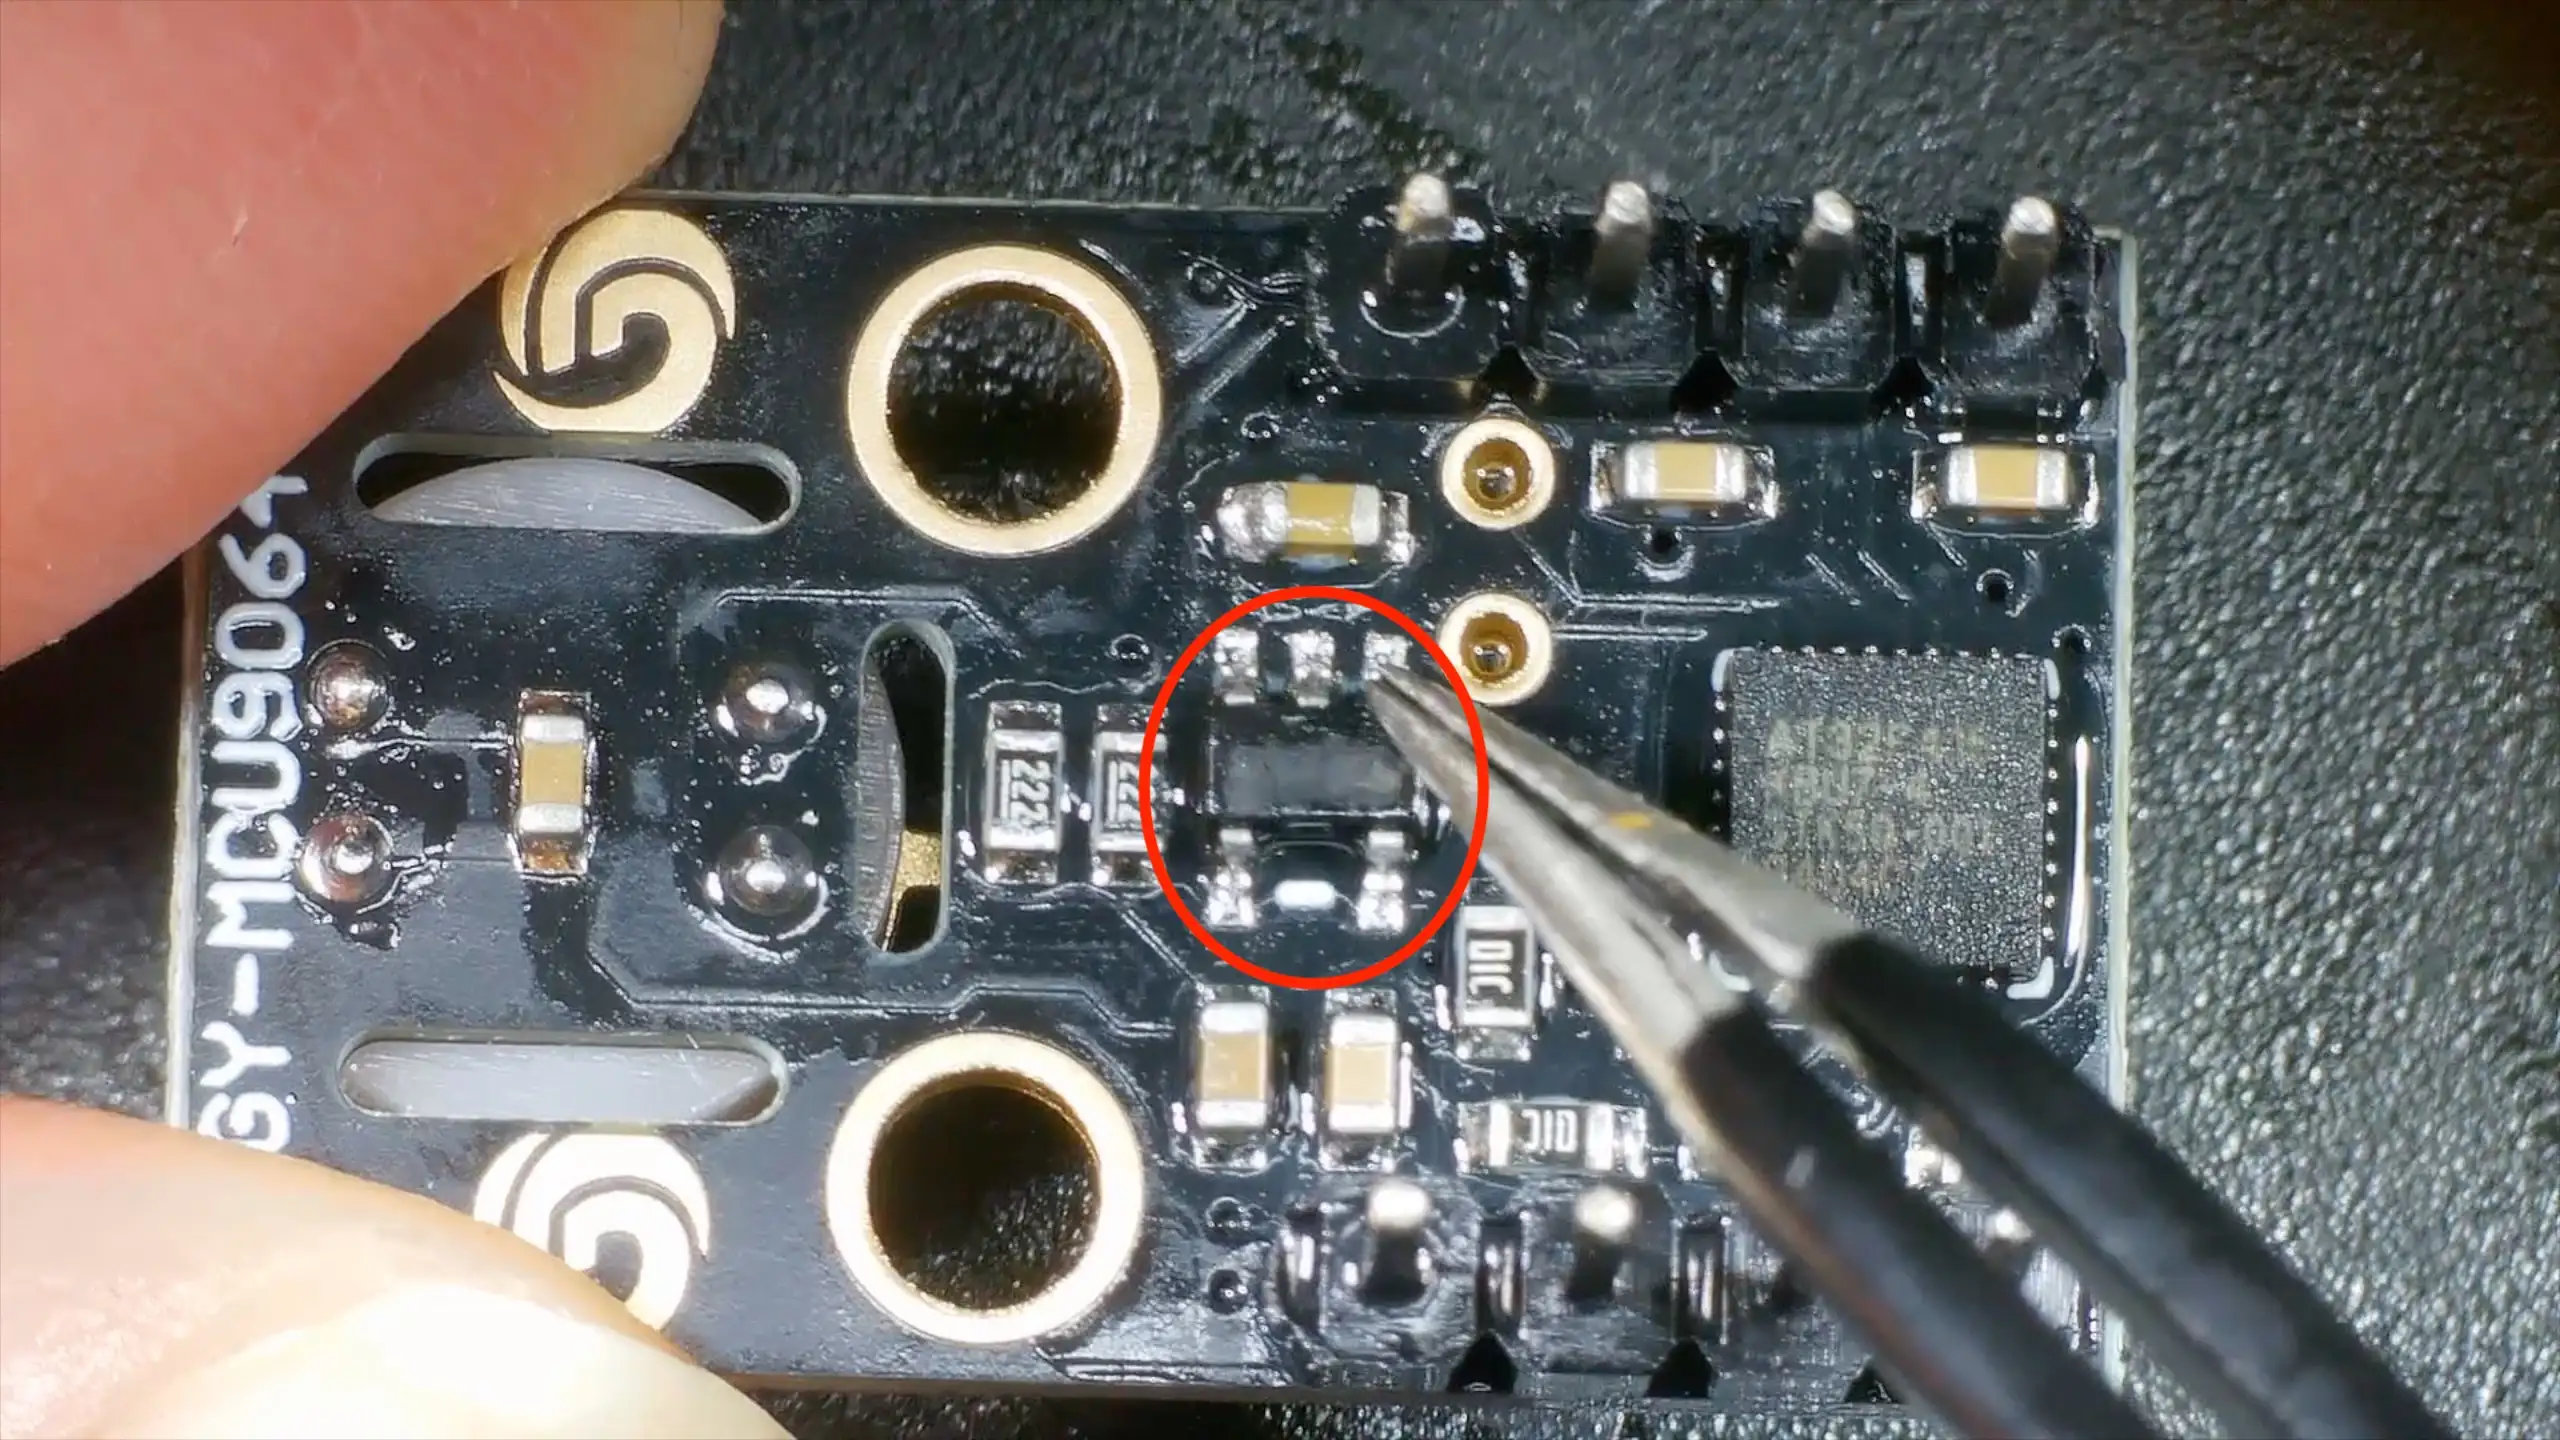
This particular thermal camera board includes:

  • Built-in I2C pull-up resistors (2.2 kΩ to 3.3 V)
  • An on-board 3.3 V regulator

In theory, that means the board expects to be powered from 5 V, feeding the regulator.

In practice, the regulator is a low-dropout device (around 120 mV dropout at 100 mA), so powering the board directly from 3.3 V worked just fine.

Importantly, because the pull-ups are tied to the 3.3 V rail, there are no weird voltage levels on the I2C bus even when powered this way - which does make me wonder how well it would work with a real 5v logic device.

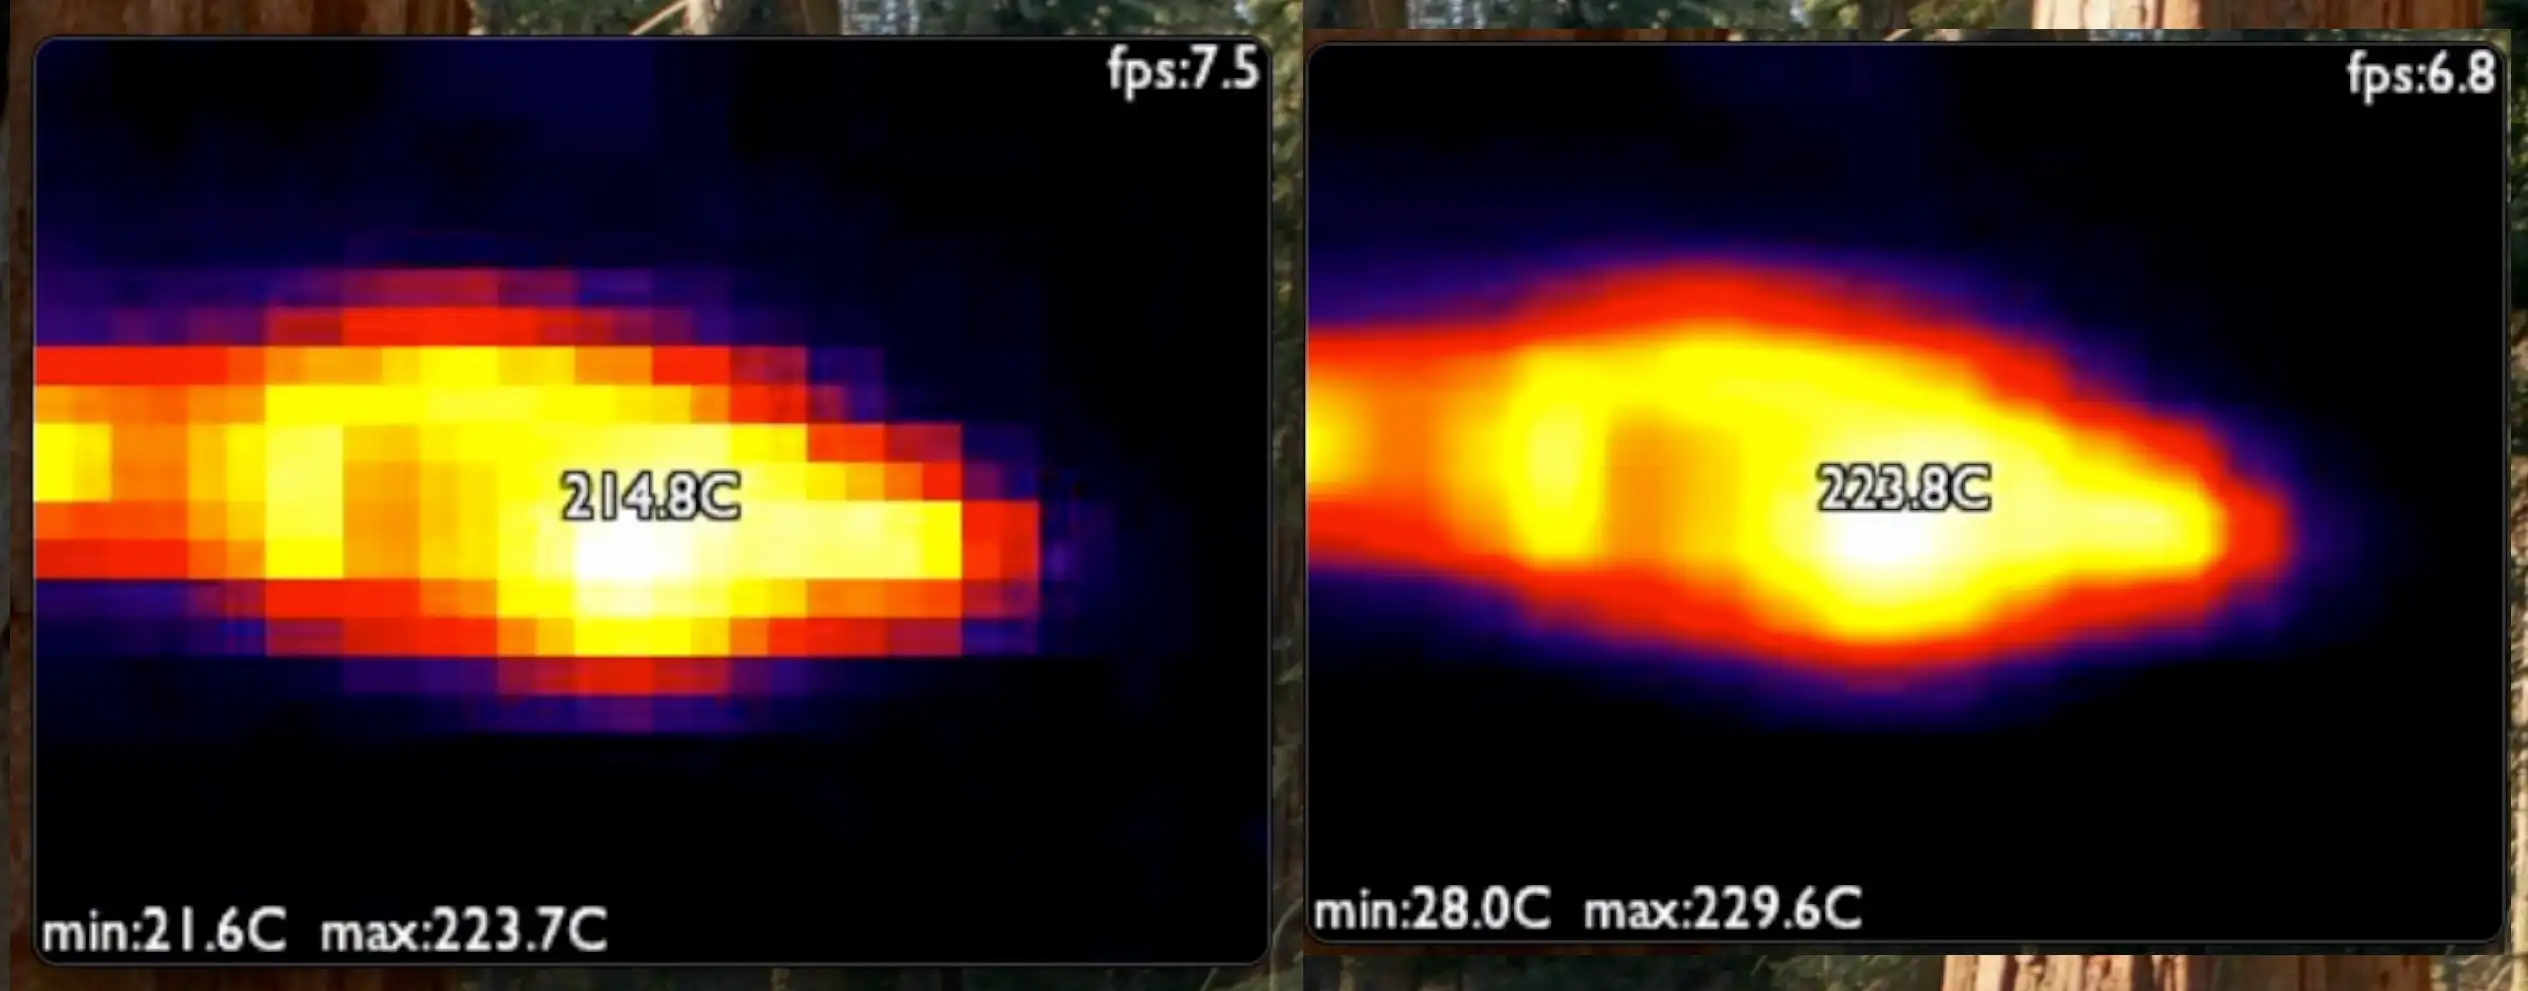
Making 32×24 pixels usable

Once the thermal data is coming in reliably, the next problem is obvious:

32×24 pixels is tiny.

The solution is to scale it up by a factor of 10× in each direction, producing a 320×240 image that fits nicely into a webcam frame.

I implemented two scaling options:

  • Nearest neighbour: very fast, but can look a bit blocky
  • Bilinear scaling: smoother, still fast enough on the ESP32-S3

Both give surprisingly good results, and once the image is scaled and colour-mapped, you’d never guess it started life at such a low resolution.

Scaling methods compared

JPEG encoding and USB streaming

After scaling, the image is JPEG-encoded and sent over USB using the UVC stack.

From the host computer’s point of view, this is just a normal webcam:

  • Works in standard camera apps
  • No custom drivers
  • No special software

Despite the low input resolution, the frame rate is perfectly usable, and the ESP32-S3 has more than enough performance to keep everything running smoothly.

You can see it all in actiion here - it’s pretty cool (or hot!).

#BILINEAR-INTERPOLATION #ESP-IDF #ESP32-S3 #HARDWARE-DEBUGGING #I2C #IMAGE-SCALING #JPEG-ENCODING #MJPEG #MLX90640 #THERMAL-IMAGING #USB-UVC #WEBCAM

Related Posts

Pong Cam - My ESP32S3 Thinks It's a WebCam! - I turned an ESP32-S3 into a plug-and-play USB webcam—with no camera attached. The ESP32 generates its own frames, encodes them as JPEGs, and streams them over UVC as MJPEG. I ramp it up from a static BBC test card, to animated GIF playback, and finally a fully playable Pong running at a solid 30 FPS. Under the hood: Espressif’s UVC device component (TinyUSB), Bulk mode for stability, AnimatedGIF for decoding, and esp_new_jpeg for fast JPEG encoding (~21–23 ms/frame). It’s a fun proof that the S3 can be a real-time “display” straight into your PC.
When “Software Bugs” Are Actually Bad Soldering - A quick MLX90640 IR camera test turned into a dead-on-I2C mystery. I ran the usual checks—addresses, pull-ups, voltages, wiring—and even fixed my forgotten UART/I2C jumper, but still nothing. A peek under the microscope revealed sketchy solder on the 3V3 LDO; a quick reflow and the sensor sprang to life. Lesson relearned: don’t trust factory soldering, look early with a microscope, and stop blaming software when the hardware’s silent.
ESP32-S3 USB UAC - I turned my new ESP32‑S3 board into a USB Audio device. After a ninja LED fix and confirming the IMU and charging, I streamed mic audio over Web Serial (with a slick AI-made ‘Audio Studio’) and then via USB UAC. The mic sounds great, but the speaker is crackly over UAC—even though I2S WAV playback is perfectly clean. ESP-IDF worked; Arduino didn’t. Bonus annoyance: macOS vs Windows is a toggle, not a combo. Still, this board passes QA.
Decoding AVI Files for Fun and... - After some quality time with my ESP32 microcontroller, I've developed a version of the TinyTV and learned a lot about video and audio streaming along the way. Using Python and Wi-Fi technology, I was able to set up the streaming server with audio data, video frames, and metadata. I've can also explored the picture quality challenges of uncompressed image data and learned about MJPEG frames. Together with JPEGDEC for depth decoding, I've managed to effectively use ESP32's dual cores to achieve an inspiring 28 frames per second. Discussing audio sync, storage options and the intricacies of container file formats for video storage led me to the AVI format. The process of reading and processing AVI file headers and the listing subtype 'movi' allowed me to make significant headway in my project. All in all, I'm pretty chuffed with my portable battery powered video player. You can check out my code over on Github!
ESP32-S3 Dev Board Assembly - I finally assembled our ESP32-S3 dev boards—used a stencil for easy SMD work, fixed a few tiny USB solder bridges with flux, and even hand-built one for fun. The EPAD isn’t required (per the datasheet), power LEDs look good, and on macOS you can spot it under /dev before flashing. A quick boot-button dance and the blink sketch runs great—full build and walkthrough in the video.

Related Videos

I Turned an ESP32 into a Thermal USB Webcam - Last time I made an ESP32 pretend to be a webcam; this time it’s a real USB UVC cam streaming MJPEG. Then I go further: I bolt on a tiny 32x24 infrared sensor, scale it up to 320x240 with nearest-neighbor or bilinear, JPEG it, and stream it like any normal webcam. Along the way I show why ESP32-CAM won’t work (no native USB), dive into I2C gremlins (run a scanner first, check pull-ups), and fix a flaky 3.3V regulator solder job. Quick hardware tour: onboard 2.2K pull-ups, ME6212 LDO, and an AT32F415 MCU. Audio can wait—today’s all about making thermal video look good over UVC.
My ESP32S3 Thinks It's a WebCam! - I turned a vanilla ESP32-S3 dev board into a USB UVC webcam that doesn’t use a camera at all—first streaming a static test card, then an animated GIF, and finally a real-time Pong game. The ESP32 pre-decodes GIF frames to RGB, JPEG-encodes them, and streams MJPEG, and for the live game it renders to a framebuffer, JPEG-encodes in ~23 ms, and just about hits 30 fps. There’s room to optimize (dual-core draw/encode), and this approach is great for dashboards, sensor visualizations, or testing video pipelines. Shout out to PCBWay for the boards—they turned out great.
I Built My Own ESP32-S3 Board… And It Actually Works! - I finally assembled my super simple ESP32‑S3 dev board—voltage regulator, reset button, three status LEDs (5V, 3.3V, and a GPIO blinker), and all pins broken out. I showed two build methods: stencil + hot-plate reflow (quick, with a few USB bridges to clean up) and full hand-solder under the microscope, complete with the rigorous ‘solid’ test. Soldered the ESP32‑S3 module (skipping the center thermal pad unless you need it), plugged in, got power LEDs, confirmed USB enumeration, flashed a blink sketch, and we’ve got a blinking LED. Next up: turning this basic dev board into something more professional for production.
Magic LEDs: Self-Organizing with ESP32 CAM & Simple Image Processing! - Unleash your creativity and transform chaos into order using an ESP32 camera board, image processing, and a string of WS2811 RGB LEDs. Find out how wiring, level shifting, and a simple web interface bring this mesmerizing project to life.
ESP32-S3 USB UAC Audio Device - does it work? - Time for an audio project: I took my PCBWay ESP32‑S3 board for a spin—fixed the common anode/cathode LED mix‑up, verified the IMU and battery charger, then tested an I2S PDM mic and tiny speaker with a Web Serial Audio Studio (scope, spectrogram, tuner). I also turned it into a USB UAC device in ESP‑IDF: the mic is clean, but speaker over UAC is crackly (Mac/Windows toggle oddity); direct I2S WAV playback is perfect, so the hardware passes QA.
HELP SUPPORT MY WORK: If you're feeling flush then please stop by Patreon Or you can make a one off donation via ko-fi
Want to keep up to date with the latest posts and videos? Subscribe to the newsletter
Blog Logo

Chris Greening


Published

> Image

atomic14

A collection of slightly mad projects, instructive/educational videos, and generally interesting stuff. Building projects around the Arduino and ESP32 platforms - we'll be exploring AI, Computer Vision, Audio, 3D Printing - it may get a bit eclectic...

View All Posts