View All Posts
read
Want to keep up to date with the latest posts and videos? Subscribe to the newsletter
HELP SUPPORT MY WORK: If you're feeling flush then please stop by Patreon Or you can make a one off donation via ko-fi
#ASSEMBLY LANGUAGE #AUDIO DATA LOADING #CIRCUIT DESIGN #EMULATION #ESP32 RAINBOW #NOSTALGIA #TECHNOLOGY #ZX SPECTRUM

If you’re a similar age to me, then the sounds you hear in the video above will trigger some nostalgic memories. I wrote about my childhood growing up some time back here.

I distinctly remember the loading screens and change in tone between loading the bits that made up the high resolution part of the image and the color information. The layout of the ZX Spectrum screen fascinated me as I tried my first forays into assembly language trying to write my own sprite routings for games.

Anyway, as a lot of you will know, I’ve been working on my personal tribute to the ZX Spectrum - the ESP32 Rainbow - available to back on Crowd Supply right now!

Loading games into emulators is pretty straightforward.

You have Z80 files - which are simply snapshots of the machine’s state (the registers and memory contents). These Z80 files load pretty much instantaneously.

And you have TAP and TZX files - these files let you accurately recreate the pulses of highs and lows that would have been stored on tape, so you can play them back into the emulator.

On my emulator we can load both TAP and TZX files at 3-4 times the speed that the original tape would load. We do this by letting the emulator run at full speed without any constraints around keeping to the 50Hz framerate.

There are various utilities that can be used to convert the TAP/TZX files back into audio data (I’ve even knocked up one myself) and you can find WAV and MP3 files of spectrum games online.

So I got to thinking - I’ve got an ESP32-S3 - it’s got a bunch of ADC converters - what’s stopping me from loading directly from audio data?

Standard ZX Spectrum tape loading is pretty easy to understand (there’s a good reference here). The tape data is made up of pulses, where a ‘pulse’ is either a mark or a space, so 2 pulses make up a complete square wave.

Before each block of data, there are a sequence of “pilot” tones - these correspond to the red and cyan border colors.
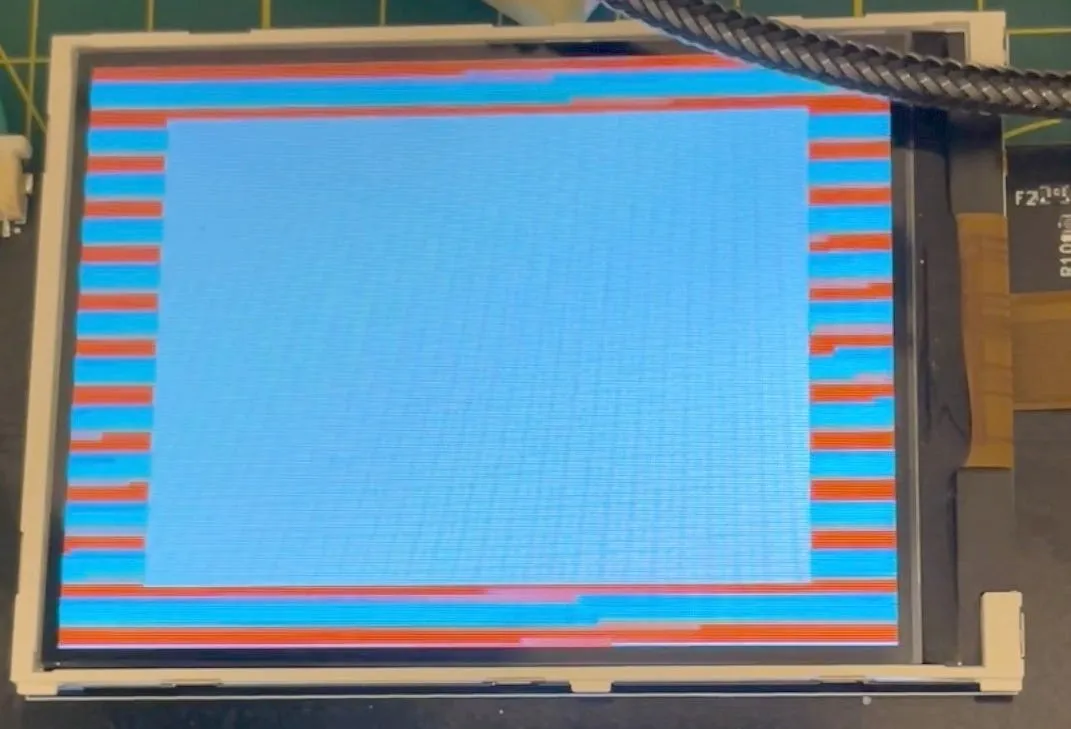
Pilot Tones

Each pulse last for 2168 T-states. The Spectrum is clocked at 3.5MHz so each pilot tone square wave takes around 1.2ms.

There are then two sync pulses of 667 and 735 T-states resp - these tell the loader that the data bits are about to start.

For the data, a ‘0’ bit is encoded using pulses with 855 T-states - so a 0 bit takes in total 1710 T-states - or around 0.488ms.

A ‘1’ bit is encoded using pulses with 1710 T-states - so a 1 bit takes in total 3420 T-state - or around 0.977ms - pretty much twice the length of a ‘0’ bit.

This has the interesting effect that if you’re loading lots of ‘0’s you get faster loading.

But on average, assuming we have an equal number of ‘1’s and ‘0’s, we’ll end up with a bit rate of about 1365 bits/s - a staggering 170 bytes/s.

I honestly do not know how 11 year old me had the patience to actually load games!

Since I don’t actually have a real cassette player. And finding real game tapes is a pretty expensive exercise, I’m going to use the headphone jack of my laptop to play the audio.
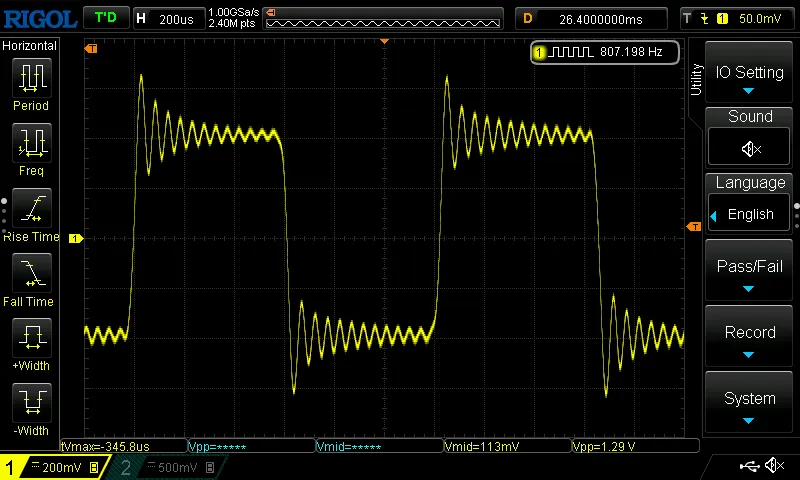
The Pilot Tone Waveform

If we look at an oscilloscope trace of the waveform we can see a problem. The signal oscillates around 0v - it goes both positive and negative.

Our ESP32 might survive that, but it’s probably best not to feed it negative signals. We’ve also got no guarantee that the signal won’t get very large. Modern computers now have all sorts of clevernesses in their audio output for detecting high end headphones - we could get quite large voltages pushed into our input.

The simplest circuit that I know of that can solve this problem (and there are many ways to skin this particular cat!) is to use a voltage divider and some protection diodes. I used CircuitLab to built and test this circuit. I have to say, I’m pretty impressed with CircuitLab - really easy to use.
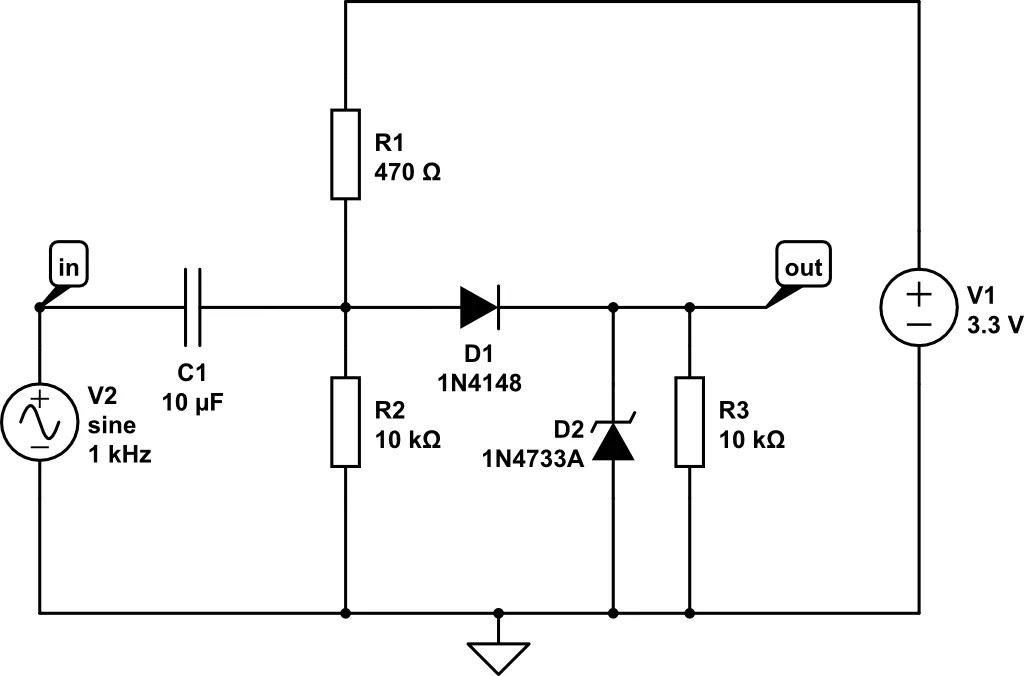
Level Shifter

You can view the iterations of the this circuit in the video - but we basically have a our input signal feeding into a DC blocking capacitor. We then shift the signal up using the voltage divider made up of R1 and R2. D1 provides protection against negative voltages, and the Zener diode D2 (I manually modified the voltage of this to 2.8 to match what I have) clamps the maximum voltage.

For small input signals, we just get a shifted version.
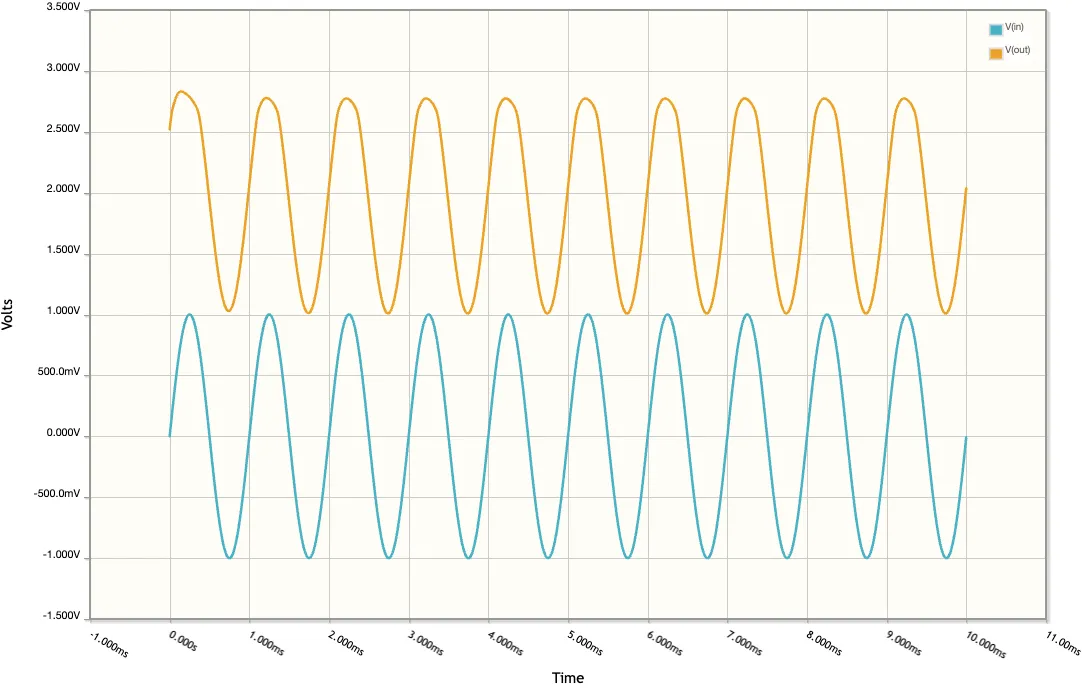
1V amplitude signal

If we try and push in very large amplitude signals then we get a nicely clipped version - no danger of damaging our ESP32.
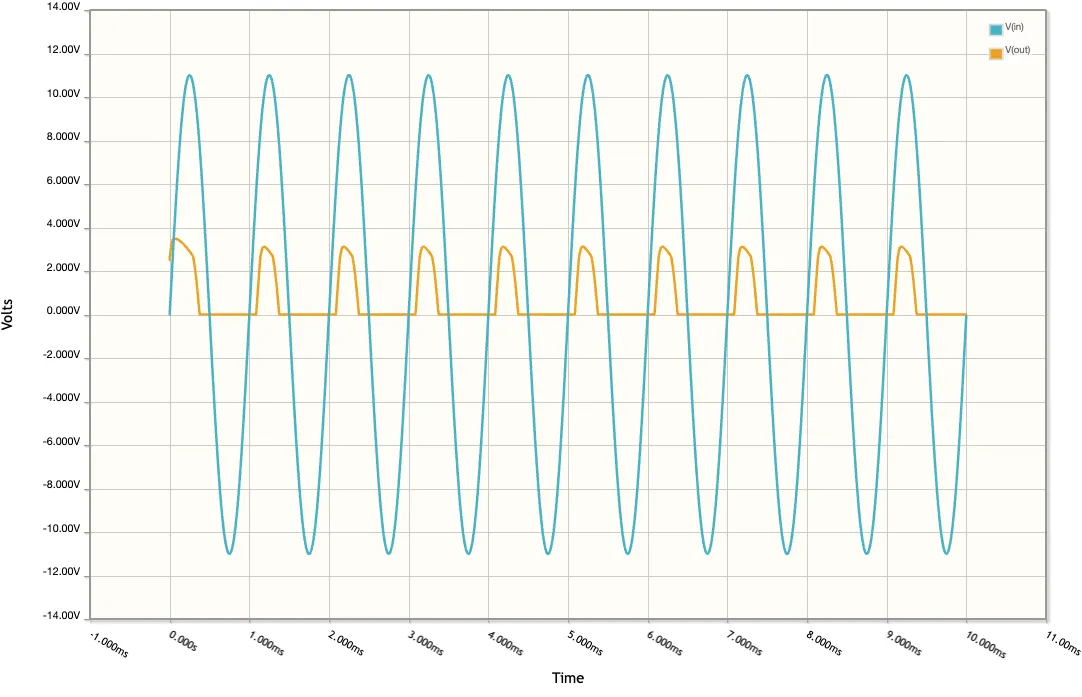
We turned it up to 11!

I built the circuit out on breadboard and tested it with my signal generator and we got results that came close enough to the simulation.
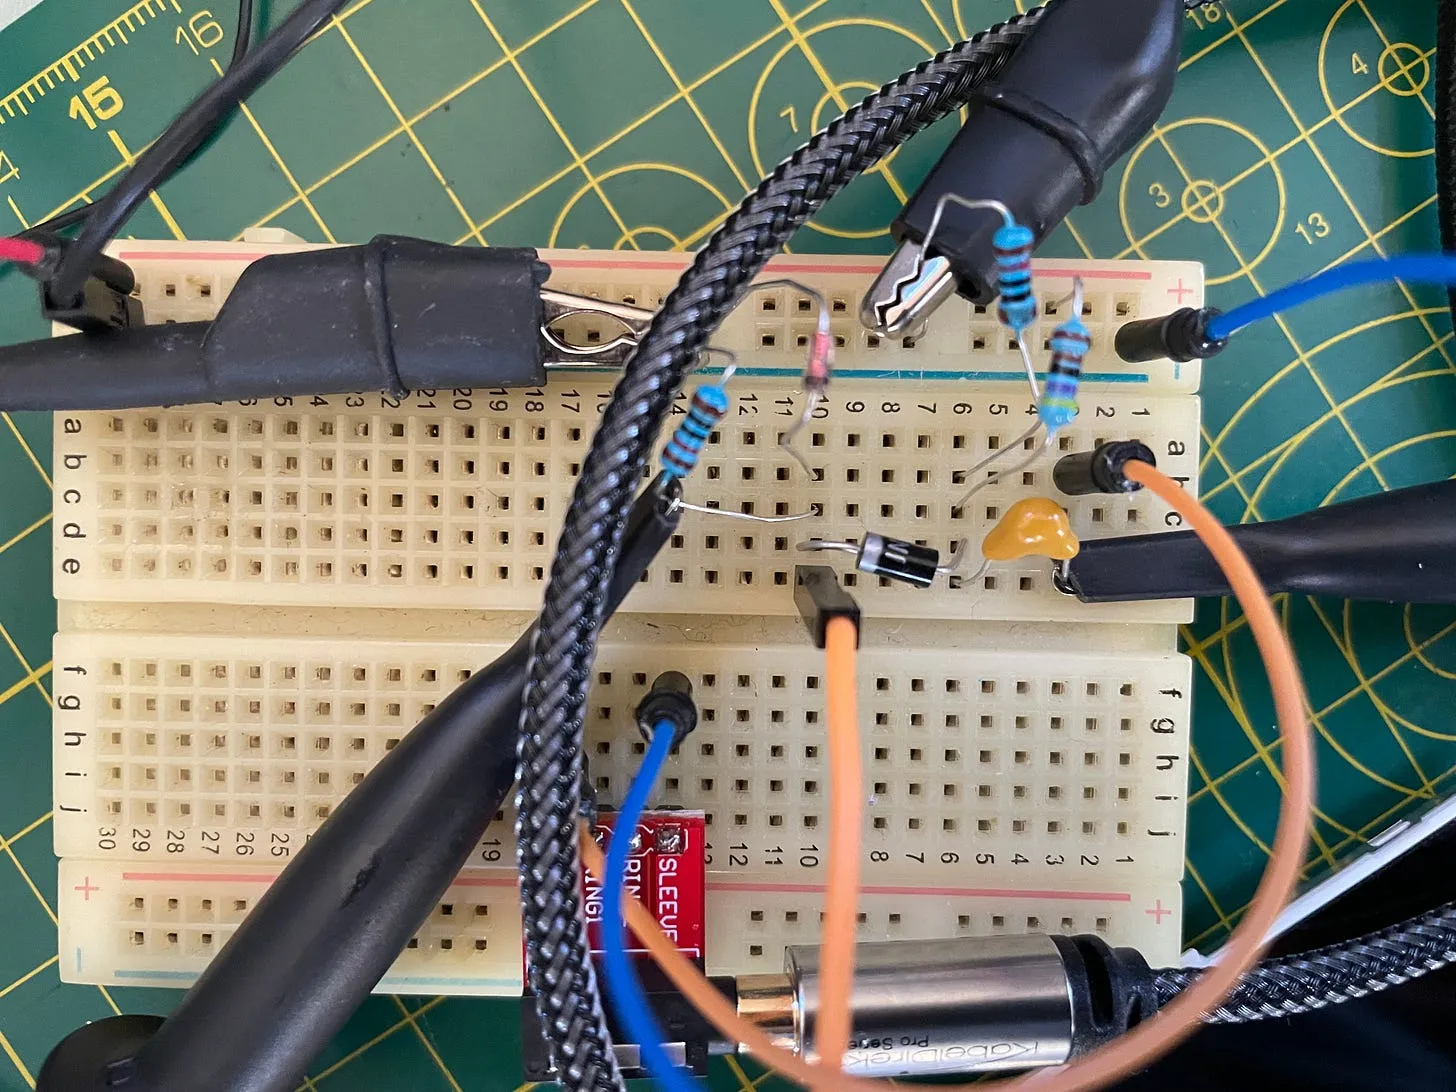
Breadboard

We can now safely play audio data into our ESP32 without any danger of blowing it up. And it works really well - I suspect it a lot more reliable than loading tapes as we don’t suffer from trying to use a cheap cassette deck…

You can watch the video at the top of the page to see it in action - or you can see the difference between loading from audio data vs loading from a TZX file in the two videos below.

Loading via audio file:

Loading via TZX file:

The TZX loading is about 4 times faster than loading from the original tape audio - pretty cool and you still get to see the loading effects and loading screen.

So, if this took you back to your childhood, please check out my ESP32 Rainbow on Crowd Supply - we’re almost fully funded!
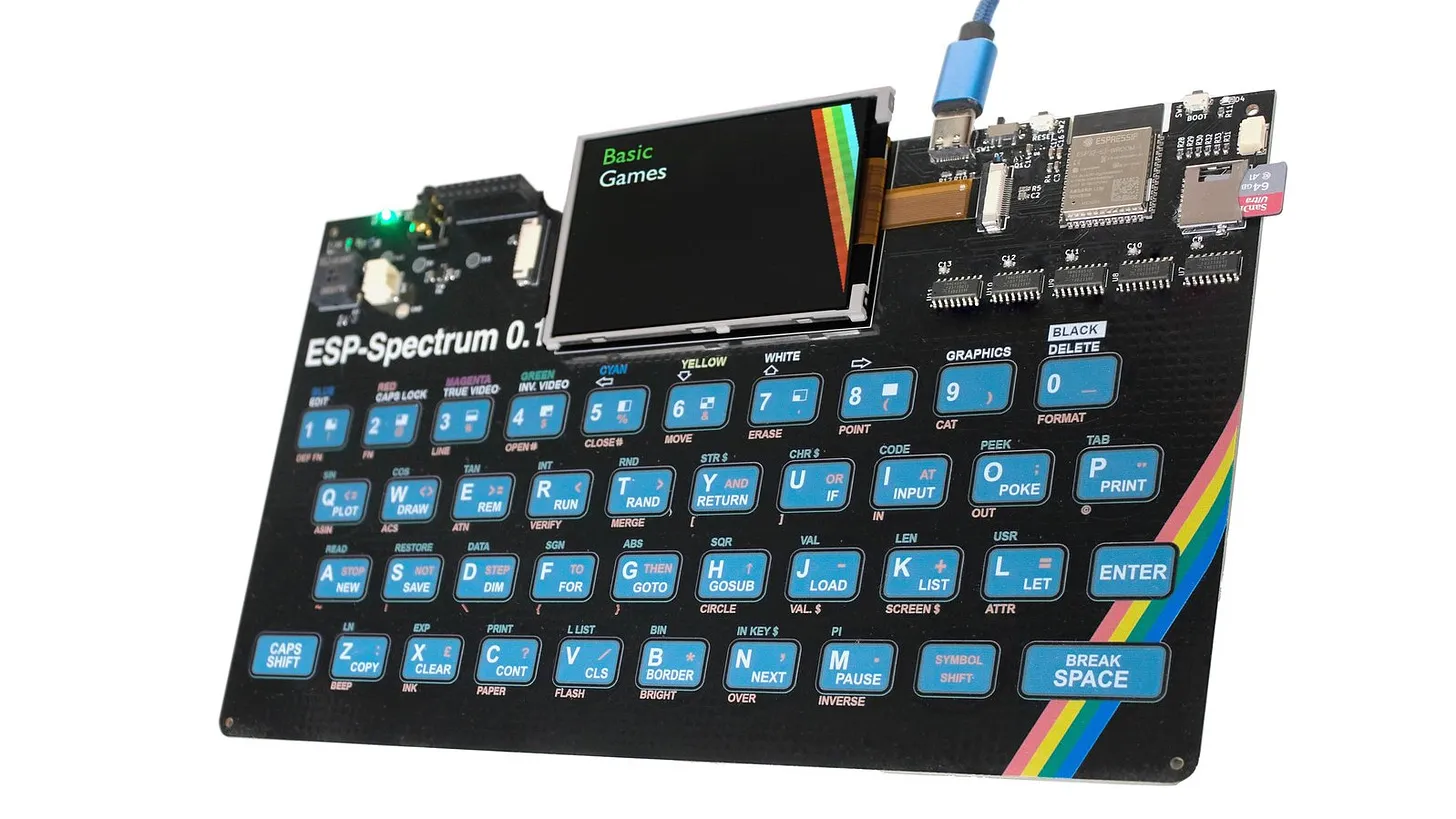
ESP32 Rainbow

#ASSEMBLY LANGUAGE #AUDIO DATA LOADING #CIRCUIT DESIGN #EMULATION #ESP32 RAINBOW #NOSTALGIA #TECHNOLOGY #ZX SPECTRUM

Related Posts

Esp32 s3 zx spectrum - In a bid to quench my nostalgia and flex my ESP32 chops, I managed to get a ZX Spectrum emulator running on my ESP32-TV board! Then, spurred on by PCBWay's new full color silk screen service, I pursuit the audacious task of recreating the ZX Spectrum's iconic keyboard. It's been quite the joyride - wrangling touch pins, shrinking screens and creating a thing of beauty on PCB. It's not quite ready for the spotlight, but keep an eye on my newsletter for more eagerly-awaited updates. It's like the Spectrum is reborn!
1 touch pin 8 touch pads - To make my ESP32 ZX Spectrum touch keyboard work even better, I needed to ensure every key was independent. The ESP32-S3 only has 14 touch pins, so I’ve been using a matrix approach. While this works well, it struggles with key combinations, critical for the ZX Spectrum. I explored touch detection and experimented with analog multiplexer ICs (4051 series) to expand the touch pins. Initial tests were promising. After prototyping with breadboard-friendly versions and ordering parts, the new keyboard was not only functional but exceeded my expectations. Scanning the keyboard now takes around 20ms, and the solution is ready for production. This was the last big challenge, and I’m thrilled with the results!
The Center of Computing History - Faced with free time in Cambridge, I decided to visit the Center of Computing History. It's a bit quirky and tucked away in an industrial park, but worth finding. Right in the entrance, you'll see the Megaprocessor, a 16-bit processor that's programmed to play Tetris. But the highlight for me was seeing the prototype ZX Spectrum, the computer that sparked my interest in tech. Though they didn't have a working Spectrum, I got a kick out of programming on a ZX81 and playing with a BBC Micro. They've even got a room full of consoles and the first ever Apple 1. Though I recorded some footage, I spent most of my time just soaking in the history of computing.
A Life in Tech - The Early Years - I was fortunate enough to enter the world in 1971 alongside Intel's 4004 microprocessor – a moment that ushered in the digital era as we know it. Although a bit of an educational renegade, my curiosity steered me down a path filled with ZX Spectrums, Christmas wish lists, dangerously strewn cables and a legion of half-disassembled childhood toys. In spite of the haphazard approach to my intellectual explorations, I eventually managed to grasp the fundamentals of assembly language and savoured the glory of publishing a small utility, all whilst navigating the complex prepubescent minefield of Dungeons & Dragons. Looking back, I wish I could've broken out of my shell to learn more from my peers and mentors. Still, I cherish these nerdy memories and the doors they opened for me in life...
Look at my shiny crystal balls - Just upgraded my basic AliExpress crystal balls with some tech wizardry - I've thrown in an ESP32-S3-MINI, a mic, and made them battery powered. Thanks to WLED software, they're now smart and responsive! Shared the KiCAD project for fellow tinkerers. Check out my video to see these balls in action!

Related Videos

ESP32-S3 ZX Spectrum - Full Color Silk Screen is really cool! - Super stoked to share this creation – an ESP32 ZX Spectrum emulator! Although it's still very much a proof-of-concept, it's looking pretty rad. I've got the classic games like Manic Miner, and yes, you can program in basic too! In perfect Sinclair fashion, I'm planning on selling this key piece of nostalgia for just £99. Work still needs to be done before the production phase, but rest assured, I'm meticulously working out the kinks, including tweaking the keyboard to ensure even better user experience. And on the technical side - a single ESP32S3 runs the show and we’ve multiplexed the keys exactly like the OG Spectrum. It's been great fun designing this piece of kit with the new full color silk screen printing from PCB way. Stay tuned for further updates!
But does it run DOOM? ESP32 ZX Spectrum update - All right, it's time for an update on my ESP Rainbow, the ZX Spectrum emulator with stunning full-color silk screen printing. I've been testing the latest boards, and PCB Way did a fantastic job. The enhancements include upgraded firmware, a 128k ZX Spectrum emulator, and a new 2-watt speaker replacing the old 7-watt buzzer. You can enjoy great sound with PWM and even play 128k games like The Never Ending Story. I've also added a snapshot feature and ported my video player over. Hardware upgrades include new capacitors and a slick power control chip for seamless battery and USB mode switching. We're gearing up for a commercial release, hopefully by Christmas, so stay tuned. And yes, it does run Doom! [Laughter]
Level Shifter Circuit - simulation and real world test. - Hey there! If you're around my age, you'll probably get nostalgic over the sound of old school tape loading on the ZX Spectrum. I took a deep dive into how the data loads, using my oscilloscope to break it all down, and even built a circuit to handle the signal for my ESP32. Throw in some cool simulations using CircuitLab, and I'm all set! Plus, I discovered a neat trick using diodes to perfect the signal. Hands-on and really quite fun!
Magic LEDs: Self-Organizing with ESP32 CAM & Simple Image Processing! - Unleash your creativity and transform chaos into order using an ESP32 camera board, image processing, and a string of WS2811 RGB LEDs. Find out how wiring, level shifting, and a simple web interface bring this mesmerizing project to life.
Surprisingly Simple! - “16-bit" Mini Handheld Arcade - In this video, I explore and dissect a 16-bit handheld gaming machine that hosts 160 Sega games. This interesting gadget priced at twenty dollars is surprisingly accurate to the original Sega console. After unboxing and testing the game Golden Axe, I opened it up to check out the internal components like the pcb, chips, battery pack and controls. Although it's not very hackable, as the functionality lies under an epoxy blob, this little machine was a treat to disassemble and reassemble, all while still keeping its functionality intact. With a dash of nostalgia and quality gaming in a handheld package, the machine is certainly an intriguing find.
HELP SUPPORT MY WORK: If you're feeling flush then please stop by Patreon Or you can make a one off donation via ko-fi
Want to keep up to date with the latest posts and videos? Subscribe to the newsletter
Blog Logo

Chris Greening


Published

> Image

atomic14

A collection of slightly mad projects, instructive/educational videos, and generally interesting stuff. Building projects around the Arduino and ESP32 platforms - we'll be exploring AI, Computer Vision, Audio, 3D Printing - it may get a bit eclectic...

View All Posts