View All Posts
read
Want to keep up to date with the latest posts and videos? Subscribe to the newsletter
HELP SUPPORT MY WORK: If you're feeling flush then please stop by Patreon Or you can make a one off donation via ko-fi
#AWS #AWS CLI #CIRCLECI #ELASTIC BEANSTALK #GITHUB #IAM #POSTGRESQL #RAILS #RBENV #RDS

In this fourth step we create a new Rails application, scaffold a model and deploy the application out to Elastic Beanstalk from the command line. We connect this application up to our RDS instance and show that it connects successfully with the dev database.

The first thing we should do is make sure we are running the same version of ruby as our Elastic Beanstalk environment. I am using rbenv for this purpose:

rbenv local 2.3.3

We then create a new rails app with postgresql as the database:

rails new DemoApp --database postgresql

Since we are going to be deploying the dev version of our application we should switch to a new “develop” branch:

cd DemoApp
git add .
git commit -m "Initial Commit"
git checkout -b develop

We can now make some changes to our application to make it suitable for deployment in the cloud. Edit the file config/database.yml and change the production entry to:

production:
  <<: *default
  url: <%= ENV['DATABASE_URL'] %>

This will pull the connection string for our database from an environment variable called DATABASE_URL.

To setup this environment variable we go the Configuration tab of our Elastic Beanstalk Application. While we are there we should also add an entry for SECRET_KEY_BASE and generate a new secret by running:

rails secret

Add these environment variables

We now need to create some credentials for deploying our application. In AWS find the IAM services and create a new user with programmatic access:

Create a new IAM User with Programmatic Access

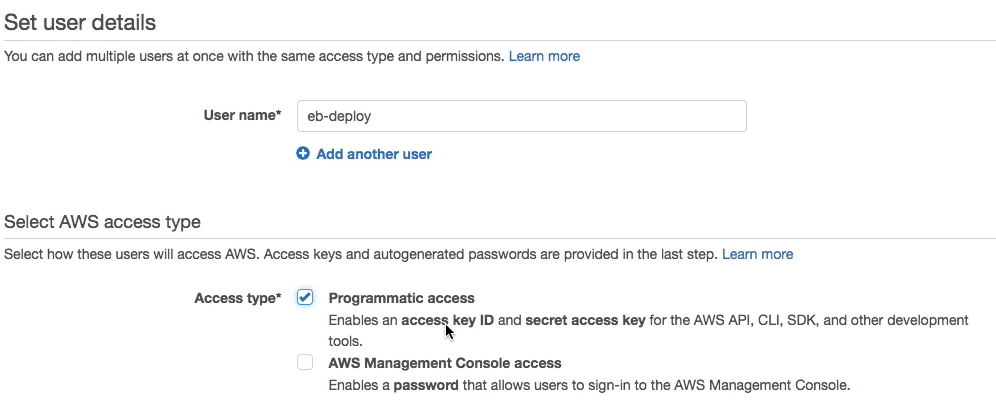
On this user select the “Attach existing policies directly” and find the ElasticBeanstalkFullAccess policy. Later you may want to adjust this policy to reduce the amount of access our deployment user has.

We should end up with a user that looks like:

Elastic Beanstalk Deployment User

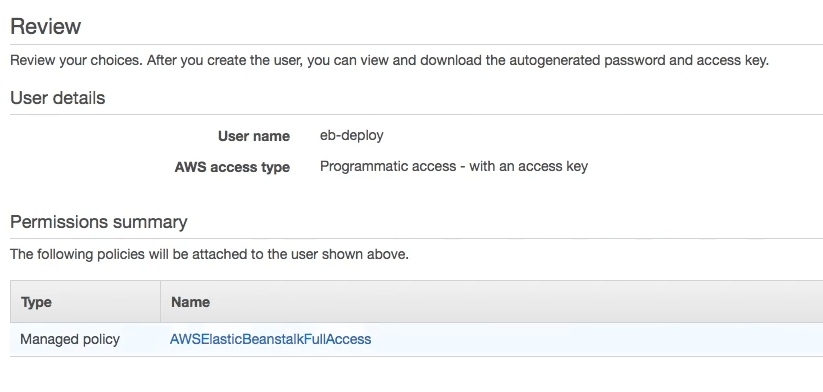
Create the user and copy the Access Key Id and Secret Access Key:

Access Key and Secret

Back on you local machine you can now configure the AWS CLI for deployment. You may need to install the AWS CLI from here (aws) and here (eb).

Run the following commands (you may want to give the profile a different name):

aws configure --profile demo

We can now start configuring our application for deployment. Run the following command:

eb init --profile demo

You will be prompted for the region you are using - make sure to use the region that matches the work you have done in the previous steps. Once you have picked a region you should see a list of available applications. Choose the application you set up in step 2.

You will also be asked if you want to use “AWS CodeCommit” for this walk through we won’t be using this service, instead we will be using GitHub and CircleCI. I’ll be blogging about CodeCommit in the near future so stay tuned!

The eb command will create a new folder in out project called .elasticbeanstalk. Inside this folder it create a config.yml file. This will look something like:

branch-defaults:
  develop:
    environment: Dev-env
environment-defaults:
  Dev-env:
    branch: null
    repository: null
global:
  application_name: Demo-Application
  default_ec2_keyname: null
  default_platform: arn:aws:elasticbeanstalk:eu-west-1::platform/Puma with Ruby 2.3 running on 64bit Amazon Linux/2.3.3
  default_region: eu-west-1
  instance_profile: null
  platform_name: null
  platform_version: null
  profile: demo
  sc: git
  workspace_type: Application

This tells Elastic Beanstalk that it should deploy our develop branch to the environment Dev-env or application Demo-Application. There is one further change we need to make - the eb command modifies our git ignore and the config.yml file is accidentally ignored by git. We want to commit this file so that our CI server can deploy to Elastic Beanstalk. Add an extra line to our .gitignore file to include the config.yml file.

!.elasticbeanstalk/config.yml

Commit all the changes to git and we are now ready to deploy. In the demo video we scaffold out a quick model so we can test the database connection. You may wish to do the same.

Once you have made any additional changes you want to make we are ready to deploy. Make sure you commit everything to git (eb will only deploy code that is committed) and then run the deploy command.

git add .
git commit -m "I made some changes"
eb deploy --profile demo

The eb command will now take our code and deploy it out to our Elastic Beanstalk environment. Once it has finished deploying test the application to make sure it is functioning as you would expect it to.

We now have a dev environment up and running. We can clone this environment to create a production environment:

Clone the dev environment

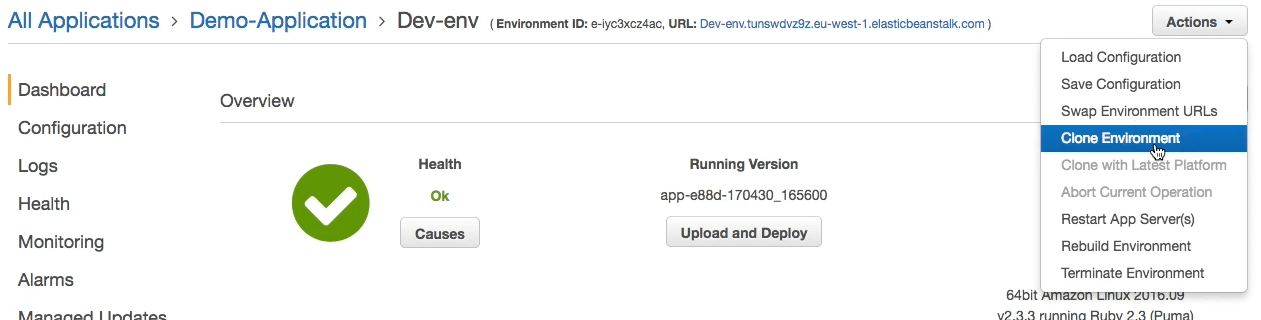
Once the clone has completed go into the new environment configuration and change the DATABASE_URL setting to point to the production database. You should also update rails secret so that it is different from the one used in dev.

We can now modify our .elasticbeanstalk/config.yml to specify the deployment settings for our master environment. In the branch defaults of the file add an entry for the master branch:

  master:
      environment: prod-env-name

Commit the changes to git and checkout the master branch. Merge develop into master and we are ready to deploy production:

git add .
git commit -m "Add production deployment"
git checkout master
git merge develop
eb deploy --profile demo

All being well we should now deploy out to our new production environment.

In the next step we will setup CircleCI to deploy automatically when a commit is pushed to develop or master.

#AWS #AWS CLI #CIRCLECI #ELASTIC BEANSTALK #GITHUB #IAM #POSTGRESQL #RAILS #RBENV #RDS

Related Posts

Step 5: Use CircleCI to Deploy To Elastic Beanstalk - In this blog post, we're going to set up an automated deployment pipeline using CircleCI, GitHub, and AWS Elastic Beanstalk. We'll begin by creating a GitHub repository for our Rails application. Next, we're going to help CircleCI understand our build environment by creating a `circle.yml` file to install the AWS EB CLI tools and to define commands for deploying our application. Lastly, we'll set up the required AWS credentials in CircleCI. Once completed, any changes pushed to the develop or master branch in GitHub will trigger a deployment to the respective environment in Elastic Beanstalk.
Step 1 - Setup VPC: Deploying a Rails Application to Elastic Beanstalk - In this blog post, I am guiding you through the process of deploying a Rails application to Elastic Beanstalk in a Virtual Private Cloud (VPC) on Amazon AWS. I detail the setup of a VPC, subnets, and internet gateways, as well as the configuration of NAT gateways and security groups. Ultimately, this will allow for a safe, internet-accessible environment for your application and its accompanying databases.
Step 2 - Setup Elastic Beanstalk: Deploying a Rails Application to Elastic Beanstalk - In this post, I describe how to set up, configure and deploy an Elastic Beanstalk application on a VPC in Amazon AWS, using Rails 5 and Ruby, using Puma for deployment and configuration of Public and Private subnets in Elastic Load Balancer. I also cover the details of network card settings, the selection process for subnets and security groups for Load Balancer and Instances, and finally shared the result of deploying the sample application on Elastic Beanstalk.
Step 8: Set up Active Job on Elastic Beanstalk - This blog post walks through setting up a worker environment on Elastic Beanstalk and using SQS as our Active Job queue, using the active-elastic-job Gem. We start by creating a new queue in our AWS account via Simple Queue Service. Then, we provide our Elastic Beanstalk environments access to the queue and add an AWS_REGION environment variable. We proceed to creating and configuring our worker environment. In our Rails app, we instruct Active Job to use our active-elastic-job queue adapter and create an Active Job. Finally, we deploy our changes to both the web and worker environments, ensuring our ActiveJobs run successfully.
Step 6: Add a Custom Domain and SSL to Elastic Beanstalk - In this post, we successfully set up a custom domain name for our Elastic Beanstalk environment and secured it using SSL. By creating a CNAME or an ALIAS pointing at our environment URL (found on the dashboard screen), we made our app accessible via the new domain name. We then used AWS Certificate Manager to add SSL to our environment for access over HTTPS, which was confirmed by visiting the secured site. Now we have a Rails application that can not only be deployed by a CI server, but is also SSL secured with a custom domain.

Related Videos

Revolutionize Your Raspberry Pi Development with VSCode Remote! - Learn how to develop code on Raspberry Pi using VSCode without needing VNC or a desktop environment by setting up a remote development environment. Develop your projects more conveniently and efficiently with this powerful tool!
Bootlace Crimping - What?, Why?, How? - Learn about the benefits of using bootlace ferrules for stranded wires and how to easily crimp them for a secure connection in screw terminals.
Build Your Own Voice-Controlled Robot with ESP32 & TensorFlow Lite - Learn how to create a voice-controlled robot using ESP32 and TensorFlow Lite with this step-by-step guide on creating neural networks, generating training data, and implementing firmware codes.
WiFi or BlueTooth - What's the best way to communicate with our things? - Discover the world of smart devices and the wireless connection options available for app developers, such as Bluetooth Low Energy and Wi-Fi. Learn about the history, performance, and challenges of these technologies and how to use them to build successful apps that communicate with hardware.
The Hacker News Effect - The Website Didn't Catch Fire - Let's look at the traffic - Witness the Hacker News effect in action as the author's blog skyrocketed to popularity, easily handling massive traffic thanks to efficient hosting and Cloudfront!
HELP SUPPORT MY WORK: If you're feeling flush then please stop by Patreon Or you can make a one off donation via ko-fi
Want to keep up to date with the latest posts and videos? Subscribe to the newsletter
Blog Logo

Chris Greening


Published

> Image

atomic14

A collection of slightly mad projects, instructive/educational videos, and generally interesting stuff. Building projects around the Arduino and ESP32 platforms - we'll be exploring AI, Computer Vision, Audio, 3D Printing - it may get a bit eclectic...

View All Posts