View All Posts
read
Want to keep up to date with the latest posts and videos? Subscribe to the newsletter
HELP SUPPORT MY WORK: If you're feeling flush then please stop by Patreon Or you can make a one off donation via ko-fi
#ACTION CABLE #ELASTIC BEANSTALK #ELASTICACHE #LOAD BALANCER #NGINX #POSTGRESQL #RAILS 5 #REDIS #WEBSOCKETS

Action Cable debuted at RailsConf 2015 and is now part of Rails 5. Built on top of WebSockets it provides real time communication with your backend server.

Part 1 of the videos is here:

And Part 2 here:

I’ve created a very simple Rails5 chat application that you can download from here.

You can run this locally using the following command:

rails s

Open a couple of browser windows and you should be able to talk to yourself…

As this is a new application we need to initialise Elastic Beanstalk and select the environment that we configures in the previous steps.

eb init

Before deploying we need to make some tweaks to our environment. Currently our load Balancer is setup to use HTTP and HTTPS - it won’t currently understand the Web Socket protocol.

We need to change this so that it uses raw TCP and SSL:
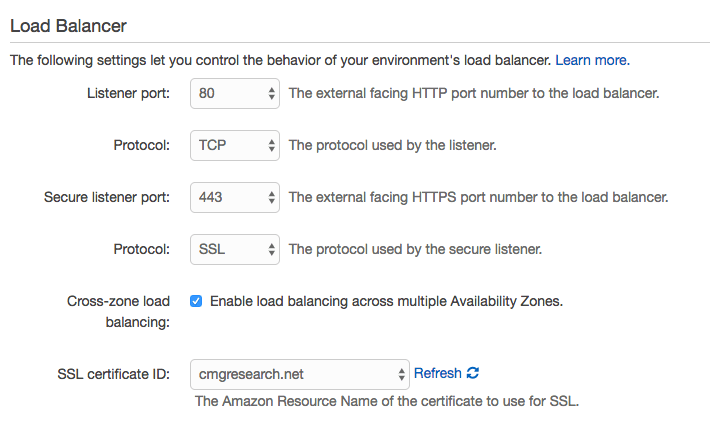
Add domains names to your certificate

The next thing we need to do is modify the configuration of the nginx instance that is sitting in front of our Rails application on the Elastic Beanstalk instances.

If we were manually configuring a server we’d simply SSH onto our machine and edit the nginx config files. This doesn’t work for PAAS type deployments where the machines you are running on are ephemeral.

To configure our nginx server we need to add a new folder to the root of our project .ebextensions and add a config file nginx.config.

files:
  /etc/nginx/conf.d/proxy.conf:
    content: |
      client_max_body_size 500M;
      server_names_hash_bucket_size 128;

      upstream backend {
        server unix:///var/run/puma/my_app.sock;
      }

      server {
        listen 80;

        access_log /var/log/nginx/access.log;
        error_log /var/log/nginx/error.log;

        server_name *.cmgresearch.net;

        large_client_header_buffers 8 32k;

        location / {
          proxy_set_header X-Real-IP $remote_addr;
          proxy_set_header X-Forwarded-For $proxy_add_x_forwarded_for;
          proxy_set_header Host $http_host;
          proxy_set_header X-NginX-Proxy true;

          proxy_buffers 8 32k;
          proxy_buffer_size 64k;

          proxy_pass http://backend;
          proxy_redirect off;

          location /assets {
            root /var/app/current/public;
          }

          # enables WS support
          location /cable {
            proxy_pass http://backend;
            proxy_http_version 1.1;
            proxy_set_header Upgrade "websocket";
            proxy_set_header Connection "Upgrade";
            proxy_set_header X-Real-IP $remote_addr;
            proxy_set_header X-Forwarded-For $proxy_add_x_forwarded_for;
          }
        }
      }


container_commands:
  01restart_nginx:
    command: "service nginx restart"

This config file will create a new file on our Elastic Beanstalk instances called /etc/nginx/conf.d/proxy.conf and will then restart the nginx server so that it picks up the new config file.

The important part this new file is:

# enables WS support
location /cable {
  proxy_pass http://backend;
  proxy_http_version 1.1;
  proxy_set_header Upgrade "websocket";
  proxy_set_header Connection "Upgrade";
  proxy_set_header X-Real-IP $remote_addr;
  proxy_set_header X-Forwarded-For $proxy_add_x_forwarded_for;
}

Using PostgreSQL

Initially we setup ActionCable to use PostgreSQL as it’s back end by setting up the

Switch back to redis by editing config/cable.yml as follows:

production:
  adapter: postgresql

This will use our existing DATABASE_URL to connect to Postgres and then use Postgres’ built in NOTIFY and LISTEN commands

Make sure all our changes are committed and deploy the application:

git add .
git commit -m "Chat app with postgres"
eb deploy --profile demo

And you should have a chat application running on your instance.

If you hit any issues with the websocket not connecting then you can use:

eb logs

to view the logs from your server - this should flag up any errors with the ActionCable system.

Using Redis

Now we know that our chat application is working in Elastic Beanstalk we can switch over to using Redis. Lets change our cable.yml file so in production it uses Redic:

production:
  adapter: redis
  url: <%= ENV['REDIS_URL'] %>  
  channel_prefix: <%= ENV['CABLE_CHANNEL_PREFIX'] %>

We now need to do some work in our VPC to create a new security group for our Redis instances and set it up so that our web server security group can access the Redis port:
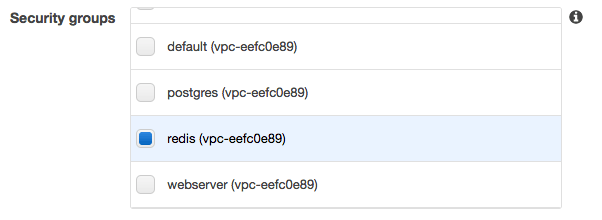
Redis Security Group

Now navigate to the ElastiCache dashboard and we can create a new Redis instance. Make sure you expand out the Advanced settings and create a new Private Subnet group with the private subnets from your VPC. This is where our convention for our subnet CIDR blocks really helps as Amazon doesn’t show us any of our names.
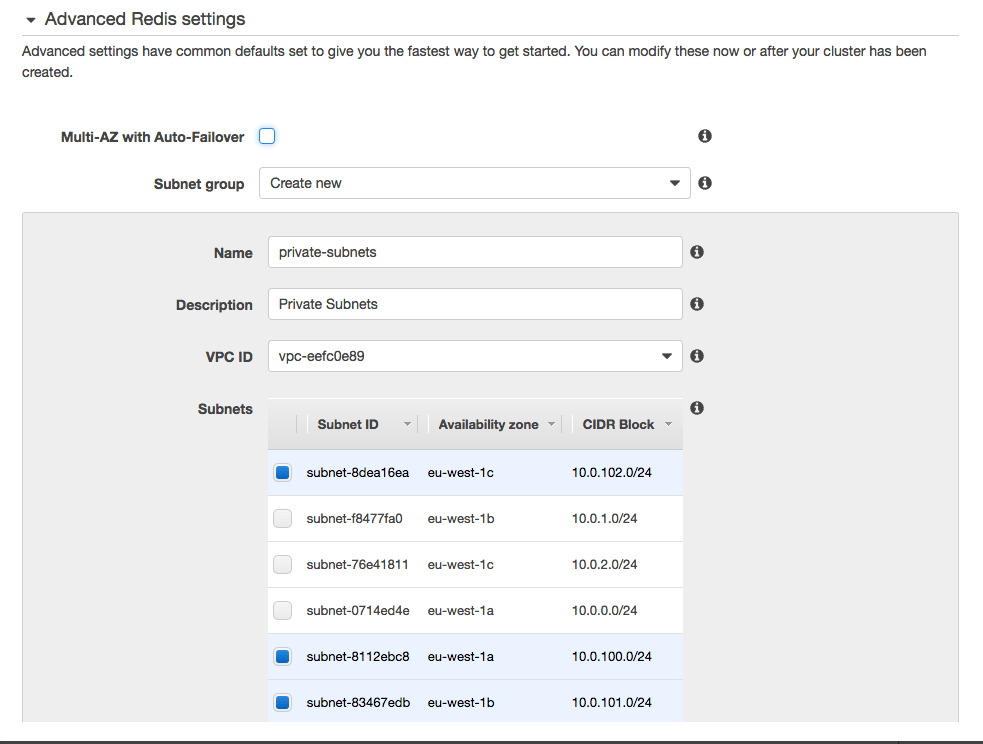
Create private subnet

Finally make sure that you place the Redis instances in our Redis security group so that it is accessible from our Web Server instances.

Redis Security Group

The last thing we need to do is add the two environment variables (REDIS_URL and CABLE_CHANNEL_PREFIX) to our Elastic Beanstalk settings.

Set CABLE_CHANNEL_PREFIX Set REDIS_URL

Once that cofiguration has completed we can deploy and test our application again:

git add .
git commit -m "Switch to Redis"
eb deploy --profile demo

All being well our chat application should still work, but now it will be using Redis as the ActionCable back end instead of PostgreSQL.

Once again, if you have issues then run check the logs as it normally tells you exactly what has gone wrong:

eb logs
#ACTION CABLE #ELASTIC BEANSTALK #ELASTICACHE #LOAD BALANCER #NGINX #POSTGRESQL #RAILS 5 #REDIS #WEBSOCKETS

Related Posts

Step 8: Set up Active Job on Elastic Beanstalk - This blog post walks through setting up a worker environment on Elastic Beanstalk and using SQS as our Active Job queue, using the active-elastic-job Gem. We start by creating a new queue in our AWS account via Simple Queue Service. Then, we provide our Elastic Beanstalk environments access to the queue and add an AWS_REGION environment variable. We proceed to creating and configuring our worker environment. In our Rails app, we instruct Active Job to use our active-elastic-job queue adapter and create an Active Job. Finally, we deploy our changes to both the web and worker environments, ensuring our ActiveJobs run successfully.
Step 4: Deploy Rails App To Elastic Beanstalk from Command Line - This post guides you through the essential steps of creating and deploying a Rails application into Elastic Beanstalk environment. Topics include creating an AWS user, configuring AWS CLI for deployment, and setting up the environment variables for your app. Also, it provides you the valuable knowledge of connecting your Rails app to RDS instance and ensuring it successfully connects with the dev database.
Step 2 - Setup Elastic Beanstalk: Deploying a Rails Application to Elastic Beanstalk - In this post, I describe how to set up, configure and deploy an Elastic Beanstalk application on a VPC in Amazon AWS, using Rails 5 and Ruby, using Puma for deployment and configuration of Public and Private subnets in Elastic Load Balancer. I also cover the details of network card settings, the selection process for subnets and security groups for Load Balancer and Instances, and finally shared the result of deploying the sample application on Elastic Beanstalk.
Connecting PSQL and Rails Console to Elastic Beanstalk - In this post, we explore a solution to the challenge of running the Rails console against a PostgreSQL database housed in a private subnet for security reasons. While it's a good security practice, it can limit access for bootstrapping users or debugging issues. By tunnelling through a Bastion server, we can establish a connection to the database as if it was running locally. We walk through code examples of SSH tunneling, database connection, and how to run Rails console. A key point is to ensure the Bastion server is shut down after use.
Step 5: Use CircleCI to Deploy To Elastic Beanstalk - In this blog post, we're going to set up an automated deployment pipeline using CircleCI, GitHub, and AWS Elastic Beanstalk. We'll begin by creating a GitHub repository for our Rails application. Next, we're going to help CircleCI understand our build environment by creating a `circle.yml` file to install the AWS EB CLI tools and to define commands for deploying our application. Lastly, we'll set up the required AWS credentials in CircleCI. Once completed, any changes pushed to the develop or master branch in GitHub will trigger a deployment to the respective environment in Elastic Beanstalk.

Related Videos

The Hacker News Effect - The Website Didn't Catch Fire - Let's look at the traffic - Witness the Hacker News effect in action as the author's blog skyrocketed to popularity, easily handling massive traffic thanks to efficient hosting and Cloudfront!
AI Powered Raspberry Pi Home Automation - Is this the future? - Witness the power of ChatGPT controlling home automation lights through a Raspberry Pi, making life easier with plugins. Delve into the fascinating world of large language models, redefining interactions with APIs.
Automating Blog Improvements with AI: Summaries, Tags, and Related Articles - Learn how to use ChatGPT to enhance your blog's homepage, create summaries and tags, find related articles, and generate post images with ease, leveraging AI to save valuable time and effort.
Revolutionize Your Raspberry Pi Development with VSCode Remote! - Learn how to develop code on Raspberry Pi using VSCode without needing VNC or a desktop environment by setting up a remote development environment. Develop your projects more conveniently and efficiently with this powerful tool!
Augmented Reality iPhone Sudoku Grab - Experience real-time augmented reality capture with the new version of Sudoku Grab! Learn to build your own app with detailed guidance provided in the linked article.
HELP SUPPORT MY WORK: If you're feeling flush then please stop by Patreon Or you can make a one off donation via ko-fi
Want to keep up to date with the latest posts and videos? Subscribe to the newsletter
Blog Logo

Chris Greening


Published

> Image

atomic14

A collection of slightly mad projects, instructive/educational videos, and generally interesting stuff. Building projects around the Arduino and ESP32 platforms - we'll be exploring AI, Computer Vision, Audio, 3D Printing - it may get a bit eclectic...

View All Posts