🌈 ESP32-S3 Rainbow: ZX Spectrum Emulator Board! Get it on Crowd Supply →
View All Posts
read
Want to keep up to date with the latest posts and videos? Subscribe to the newsletter
HELP SUPPORT MY WORK: If you're feeling flush then please stop by Patreon Or you can make a one off donation via ko-fi
#ELECTRONICS #HT140 #SEQURE #SOLDERING #TECH TOOLS

I recently received a free gift from Sequre - they sent me a new piece of gear to try out: the HT140 Solder Tweezers.

The specs

What’s in the Box?

  • A **flexible USB cable**

  • A **65W power supply** with a UK adapter

  • A **stand** for the tweezers

  • The **HT140 Solder Tweezers** themselves

  • Some **tiny grub screws** for holding the tweezer tips in place

  • A nice **storage case**

The stand was pretty straightforward to build - just a couple of screws. And adjusting the tips was also pretty easy.

I really need to clean my magnifying glass!

The grub screws are *really* small, so Sequre wisely included spares—because let’s be honest, they’d be lost in no time otherwise.

Powering It Up

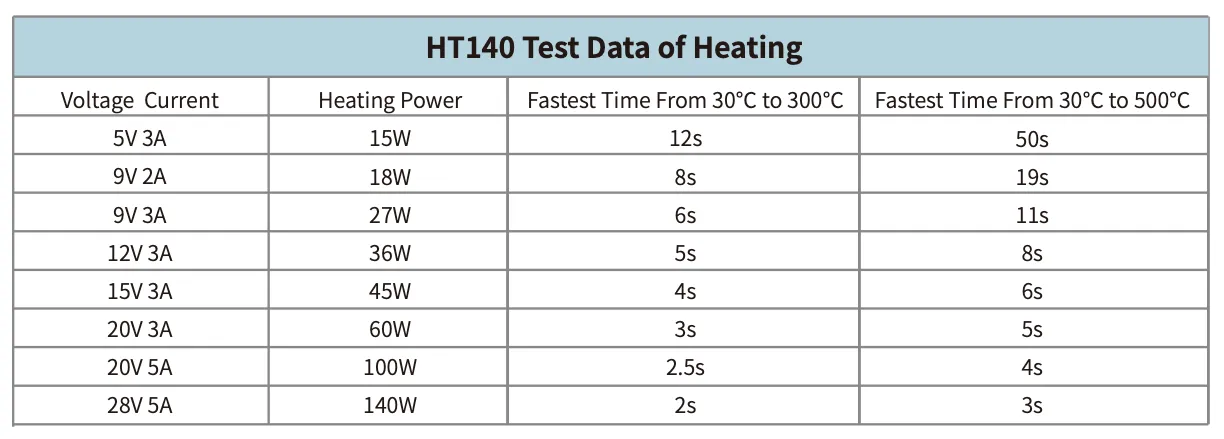
The HT140 can be powered using either a **DC jack or USB-C**, so I opted for USB-C. It seems to take full advantage of power delivery and turned my power supply up to 20V and drew 3Amps when heating.

Heating up

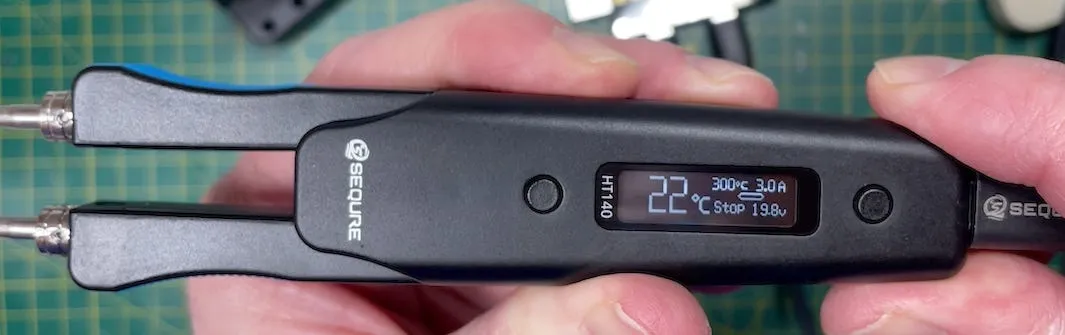
Heating up time is pretty fast with power delivery. And the included 65W power supply does actually seem to be a proper 65W power supply.
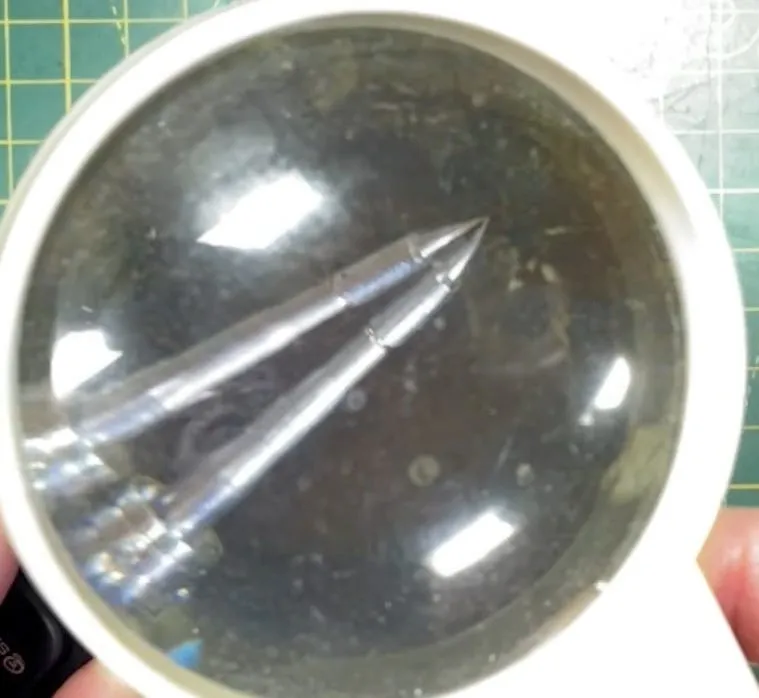
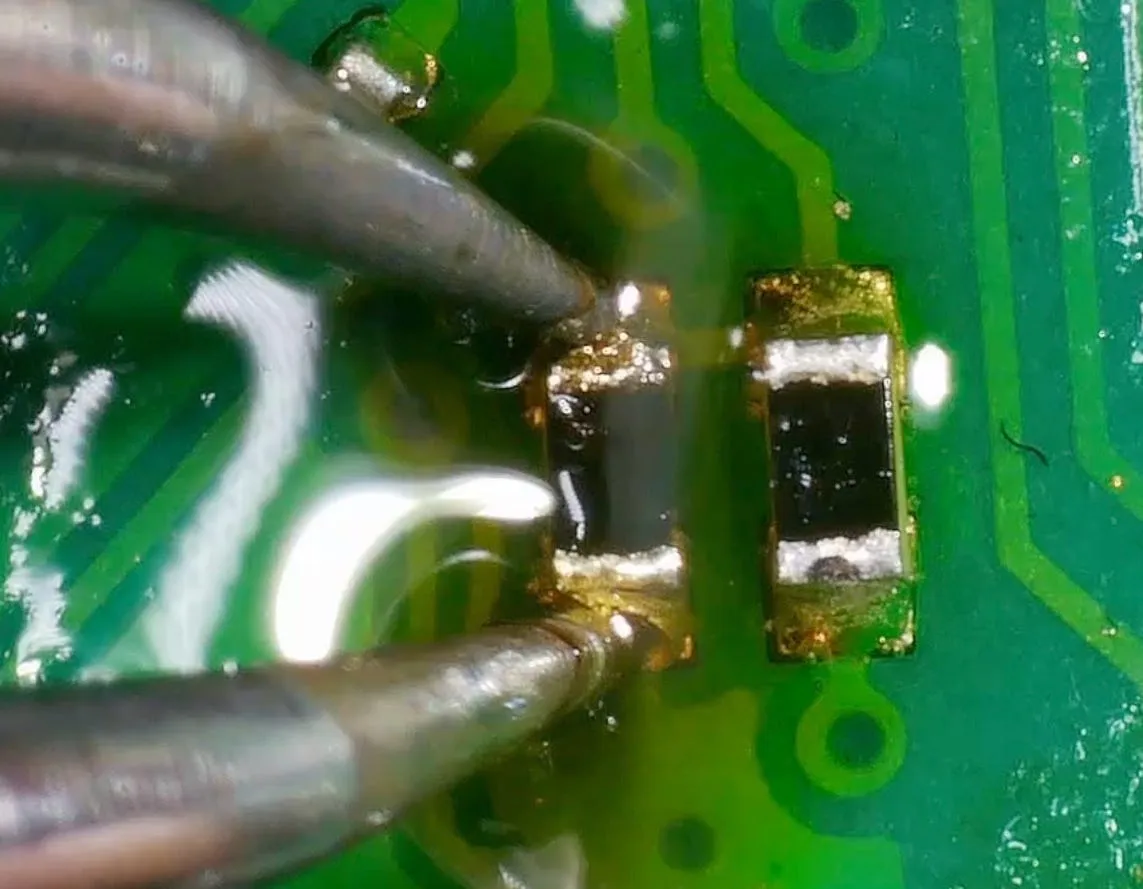
Super fast heating!

Testing it out

To test it out, I removed a few components from a dead Raspberry Pi Pico board. This has a nice selection of tiny components and some bigger ones.

Tiny components

The tweezers work really well, a bit of flux to help the heat get into the solder definitely helps. For components with large ground planes I did have to bump up the temperature, but that’s to be expected.

Desoldering

It’s a nice addition to my tool kit - though I am really hoping I don’t need to use them too much - I’ve got 300 boards on order with PCBWay and I don’t want to do any rework!

#ELECTRONICS #HT140 #SEQURE #SOLDERING #TECH TOOLS

Related Posts

Flashing the TS80P with IronOS - In this blog post, I explore the TS80P soldering iron, a tool that has been generating buzz. One of the highlights is that its firmware can be flashed with an open source system called IronOS. Here, I share my process of flashing the TS80P with IronOS and testing it out on a Raspberry Pico W. Please note, a Quick Charge or Power Delivery supporting power supply is needed for this iron. While running some tests, I observed that using a fast charger can heat this iron up twice as fast as using an Apple charger. Also, flashing the firmware is straightforward but you might need a little patience if you are using a basic USB supply.
I Need More USB Power! - I've been accumulating more and more USB powered devices for my workbench lately, and my single 65W USB-C supply just isn't cutting it anymore. So, I've decided to source a new solution. After some digging, I stumbled upon a remarkable board on AliExpress with four USB standard sockets and four USB-C ports, which support just about every protocol there is! Oh, it easily delivers a solid 65 Watts. With this, I am finally able to fully power my gear. From mini hotplates to soldering irons, my workbench is more juiced up than ever!
I broke it and then i fixed it - Started off on a techie adventure with an RP2040 DVI board from Adafruit, aiming to get the pico-zxspectrum going. Things started acting haywire once the USB hub got involved, ending in a complete shutdown, intuitive diagnosis showed the power pin was a ghost town! After pin-pointing (and removing) the dead IC, I performed a delicate soldering operation to bless it with a new 3V3 regulator. Working the kinks out with the resolution led to a thrilling revival and, voila, we were back in business with DVI output and SD Card support!
Are my usb cables any good - Building a USB cable tester turned out to be trickier than anticipated! My first attempt with fully shielded USB sockets was foiled by design flaws and hidden solder issues. The second iteration featured more accessible sockets, yet still posed challenges. The improvement allowed us to distinguish between high-speed cables and average ones. I'm now in the midst of creating Version 3, with all connections broken out for easy testing. Stay tuned for what's next in this unexpectedly complex journey!
1 touch pin 8 touch pads - To make my ESP32 ZX Spectrum touch keyboard work even better, I needed to ensure every key was independent. The ESP32-S3 only has 14 touch pins, so I’ve been using a matrix approach. While this works well, it struggles with key combinations, critical for the ZX Spectrum. I explored touch detection and experimented with analog multiplexer ICs (4051 series) to expand the touch pins. Initial tests were promising. After prototyping with breadboard-friendly versions and ordering parts, the new keyboard was not only functional but exceeded my expectations. Scanning the keyboard now takes around 20ms, and the solution is ready for production. This was the last big challenge, and I’m thrilled with the results!

Related Videos

Soldering up another ESP32-S3 board and a 3in1 Oscilloscope - So in this video, I had a fun time experimenting with the cool gadgets sent over to me by Fury. I unwrapped this awesome USB soldering iron that looks quite promising and useful. The tiny solder stand, a Galium nitri power supply and a collection of soldering iron bits that they sent over were quite appreciable. The video took a spin when I introduced the novel 3in1 oscilloscope. This tool bundles an oscilloscope, a transistor tester and a signal generator. Well, that's a triple threat! I went on to test the soldering iron and it showed some remarkable results. The video ended with me trying out the oscilloscope and I must say, this little toy packs a punch! All things considered, pretty pleased with my new tech. Can't wait to get down and dirty with all the nitty-gritties these gadgets offer!
Electronic Chopsticks! Looking at some Soldering Tweezers - So I just unboxed a nifty gift from Secure - the HT140 solder tweezers, and they're super impressive! They heat up to 300°C super fast, thanks to the 65-watt power delivery. I tried desoldering components on a Pico board - despite being a bit tricky with non-leaded solder, they worked great after a bit of flux and temperature adjustments. These tweezers are definitely going to be a handy addition for reworking my PCBs. Big thanks to Sequre!
Upgrade Your Soldering Game: TS80P IronOS Flash & Raspberry Pi Pico W Soldering - Upgrade your soldering skills with the TS80P soldering iron, known for its compatibility with open-source firmware IronOS. Witness how it quickly heats up when paired with different USB power supplies, and its potential to replace traditional soldering stations.
A Lot of Hot Air - Soldering ESP32-S3 Boards - In this video, I test out the new hot air rework station I just got to solder my Mini esp32 S3 boards. I dissect the hot air gun, encountering an Australian plug and a couple of interesting quirks inside the control PCB. I attempt to understand the circuit, welcome your thoughts on the build quality, and then solder on a new, hopefully safer, UK-compliant plug. Post-assembly, I apply way too much solder paste thanks to these tricky solder syringes, before setting the station to 300 degrees C for some hands-on rework. After some trials, I successfully fix some solder bridges with my soldering iron and behold, everything is connected and it works! It's just another blink sketch, but hey, it's confirmed – The new hot air station works!
Simple Multi USB-C Power Module - With my growing list of USB-C powered devices and just one cable, I found myself underpowered on my bench. My solution? Scouring the depths of AliExpress for USB-C power delivery, QC2, and QC3 step-down converters. After initially purchasing individual boards, I struck gold with an ultra-convenient 4-in-one board. Paired with a Meanwell power supply, I enjoyed pushing my new setup to its limits with the MiniWare electronic load tester. Although managing to pull a decent 65W, I'm dreaming up a 3D printed enclosure and eyeing up MiniWare's display modules for future improvements. I reckon, while I'm battling delayed PCBs and dodgy components, it's certainly a fun way to help power up my bench!
HELP SUPPORT MY WORK: If you're feeling flush then please stop by Patreon Or you can make a one off donation via ko-fi
Want to keep up to date with the latest posts and videos? Subscribe to the newsletter
Blog Logo

Chris Greening


Published

> Image

atomic14

A collection of slightly mad projects, instructive/educational videos, and generally interesting stuff. Building projects around the Arduino and ESP32 platforms - we'll be exploring AI, Computer Vision, Audio, 3D Printing - it may get a bit eclectic...

View All Posts